Posts mit dem Label personalized werden angezeigt. Alle Posts anzeigen

Donnerstag, 25. November 2021

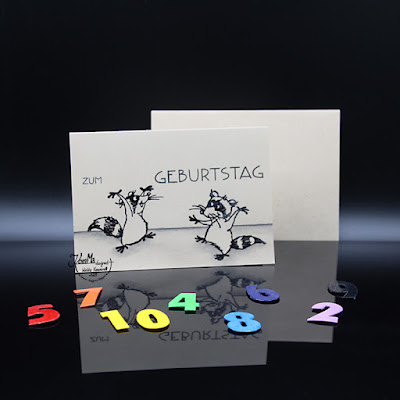
K1-1223 - Geburtstags Waschbären

Wenn man Geburtstagskarten auf Vorrat macht, ist man ja leider  immer ein wenig eingeschränkt, was Details anbelangt... 
Ich finde ja personalisierte Karten immer toll - egal ob mit dem Namen vorne drauf oder mit dem Alter bei einer Geburtstagskarte.

Da kam mir die Idee, eine kleine Reihe von schlichten Karten mit kleinen Viechereien zu gestalten und mit einer "Lücke" im Text. In diese kann man dann ganz unkompliziert noch die aktuell benötigte Zahl in Wunschfarbe einfügen!
Ich hab extra hierfür eine kleine Box vorbereitet, in der ich all die Zahlen nun aufbewahre, um sie jederzeit griffbereit zu haben.

Diese Lösung ist perfekt geeignet, wenn eines der Kinder mal wieder überraschend zu einem Geburtstag im Freundeskreis von Kita und Schule eingeladen wird.
Aber auch, wenn man zB auf Märkten* verkauft und nicht ein großes Sortiment an Karten für die unterschiedlichen Altersstufen vorbereiten möchte (die man dann vielleicht gar nicht braucht!) - das würde ja irgendwann auch die Logistik eines Hobby-Bastlers sprengen!

*
Kunstmärkte, kleine Events, Weihnachtsmärkten... - vielleicht wird es ja irgendwann wieder möglich sein, dass so was stattfinden kann!

:-:-:-:-:-:-:-:-:-:-:-:

When you create cards for stock, you are always a bit limited in the question of details...
I love personalized cards - with the name on the front layer or with the age on a birthday card.

So I had the idea to create a pile of sober cards with some critters and with a "gap" in the sentiment. Here you can add the needed number in the colour of your choice easily! 
I prepared a little box with all the numbers in it to have them ready to use whenever I need one.

This solution is perfect, when one of the kids gets a sudden invitation from the kindergarden or the class mates.
But also when you sell your cards on markets* and you don't want to prepare lots of cards for the different ages (and don't use them!) - that would go beyond the scope of a hobby-crafters logistic!
*Artist markets, little festivals, christmas markets... - maybe they will be possible one day again...
:-:-:-:-:-:-:-:-:-:-:-:-:-:-:-:-:-:-:-:
KomMa-designed_K1-1223_GeburtstagsWaschbaeren#1
K1-1223 - Geburtstags Waschbären
KomMa-designed_K1-1223_GeburtstagsWaschbaeren#2
K1-1223 - Geburtstags Waschbären
:-:-:-:-:-:-:-:-:-:-:-:-:-:-:-:-:-:-:-: 
Entered in these Challenges:
:-:-:-:-:-:-:-:-:-:-:-:-:-:-:-:-:-:-:-:
Used Materials:
Stampendous: Cling Stamps: Rooco REach (CRF203) & Rooco Feelings (CRH264/CRS1003) /
Create A Smile: Stamps: Mini Geburtstag / 
& Die Cut Numbers

Colours & other stuff:
Stampin'Up: Notecards + Envelopes - crumb cake savanne (133766) / Cardstock - different colours /
Tsukineko: VersaMark Ink / Ranger: Embossing Powder - black, clear  / FaberCastell: Albrecht Dürer Aquarell-Buntstifte - black + H2O  (für die Schattierungen / for the shading) /
:-:-:-:-:-:-:-:-:-:-:-:-:-:-:-:-:-:-:-:
Zählende Grüße von Wiebke
Counting greetings from Wiebke
:-:-:-:-:-:-:-:-:-:-:-:-:-:-:-:-:-:-:-:

Samstag, 22. Februar 2020

K1-1308 - Wanderlust

Heute zeige ich euch eine Karte, die ich auf Wunsch einer Freundin für einen Geburtstag gemacht habe. 
Abgestimmt auf das großes Hobby des Geburtstagskindes Wandern (und auch auf das Geschenk, das sie bekommen soll) hab ich einige Elemente aus der Natur und passende Ausrüstungsgegenstände kombiniert.
Die Farbgebung ist auch eher schlicht und naturnah gehalten.


Der Text ist handgeschrieben und entspricht genau dem gewünschten Wortlaut meiner Freundin.

Das Innere ist absichtlich uncoloriert geblieben - ganz "natural", wie auch der kleine Pilz auf der Vorderseite.

Today I share a card I made on request of a friend for a birthday.
The big hobby of the birthday person wanderlust (and also the present she will get) inspired me so I combined some elements out of the nature and of fitting equipment pieces. 

The colour choice is simple and in harmony with nature.

The sentiment ist handwritten and my friend asked me to write exact these words.

The inside I left intentional uncoloured- totally natural, also the little mushroom on the front.

Translation of the German sentiment is a bit difficult, cause it's a selfmade little poem... But I try to show you the meaning  in the card a bit better...
"Beim Wandern über Stock und Stein soll Freude dein Begleiter sein" is something like "When you walk across the country / over rough and smooth joy should be your comagnon".
:-:-:-:-:-:-:-:-:-:-:-:-:-:-:-:-:-:-:-:
K1-1308 - Wanderlust
K1-1308 - Wanderlust - Inside
:-:-:-:-:-:-:-:-:-:-:-:-:-:-:-:-:-:-:-:
:-:-:-:-:-:-:-:-:-:-:-:-:-:-:-:-:-:-:-:
Used Materials:
Lawn Fawn: Stamps: Say Cheese, Happy Summer, Critters in the Forrest (inside) /
Stampin'Up: Echt cool (147331), Am Ufer (SAB 147081) /
docrafts: xCut Mini - Nordic heart & foliage (HCR503910), Camera (HCR503632) /
We R Memory Keepers: Envelope punch board /

Colours & other stuff:
Stampin'Up: Cardstock - Flüsterweiß, Wasabigrün (Umschlag) / Cardstock-Scraps - kraft hell, kraft dunkel, glanz schwarz /
Tsukineko: Memento - tuxedo black / Ranger: Oxide Inks - pumic stone, weathered wood, hickory smoke, shabby shutters, bundled sage, mowed lawn, tumbled glass, pine needles & Multi Medium matte / Faber Castell: PolyChromos & Pitt artist pen S, F, M - black / Kuretake/Zig: Wink of Stella - gl.clear /
doppelseoitiges Klebeband / Kleberoller /
:-:-:-:-:-:-:-:-:-:-:-:-:-:-:-:-:-:-:-:
Wandernde Grüße von Wiebke
Wandering greetings from Wiebke
:-:-:-:-:-:-:-:-:-:-:-:-:-:-:-:-:-:-:-:

Donnerstag, 19. September 2019

K1-1158 - Driving Home Bear

Vor kurzem bat mich ein Freund, eine Geburtstagskarte für seine Frau zu entwerfen. Da das Geschenk mit dem Thema Auto zu tun hatte, hab ich das süße Bärenset "Town Bear" verwendet und damit eine knuffige Action-Karte für die liebe Anja gezaubert! :-)
Im Karten Inneren war dann noch ein Glückwunsch-Text gestempelt (den hab ich leider vergessen zu fotografieren!).

Recently a good friend asked me to create a birthday card for his wife. The gift was car-themed so I decided to use the sweet "Town Bear" stamp set to create a cute action card for my friend Anja! :-)
On the inside I stamped a birthday sentiment (but I forgot to make pics of it, sorry!).
:-:-:-:-:-:-:-:-:-:-:-:-:-:-:-:-:-:-:-:
K1-1158 - Driving Home Bear - Start
K1-1158 - Driving Home Bear - on the way
K1-1158 - Driving Home Bear - animated car
K1-1158 - Driving Home Bear - animated background
:-:-:-:-:-:-:-:-:-:-:-:-:-:-:-:-:-:-:-:
Vom Aufbau her sind Slider-Karten ja eigentlich recht einfach: 
  • Eine Szene zusammenstellen, die Hintergrund-Elemente stempeln und kolorieren. 
  • Auf ein extra Stück Papier die Vordergrund-Elemente und die beweglichen Teile stempeln, kolorieren und ausschneiden.
  • Den Bewegungs-Pfad festlegen und ausscheiden. Auf der Kartenbasis den dadurch sichtbaren Bereich gestalten (hier die Straße).
  • Das Sliderelement montieren und es, für eine bessere Beweglichkeit, unterhalb des Hintergrund-Papiers mit einer Münze beschweren.
  • Den Hintergrund mit 3D Tape auf der Kartenbasis montieren.
  • Alle Vordergrund-Motive ebenfalls mit (dünnem)3D Pads aufkleben.
Gesagt - getan. Klappte auch alles gut, bis ich beim finalen Bewegungstest plötzlich feststellte, dass das Auto aufgrund meiner Art der Montage (etwa mittig zwischen Reifen und Fenster) nicht auf, sondern neben der Straße fährt! Aber da ich nicht alles nochmal auseinander reißen wollte, ist es jetzt eben ein off-road Geländewagen (oder ein SUV)! ;-)

Eines ist noch wichtig: 
Damit das Auto sich nicht um sich selbst dreht, benötigt es entweder eine ovale oder zwei nah beieinander liegende runde Abstandshalter zur Münze!

The making of a slider card is in fact really simple:
  • Create a scene, stamp and colour the background elements.
  • Stamp and colour all foreground  and slider elements on an extra piece of paper and cut them out.
  • Decide where the slider path should be and cut it out. If necessary colour this area on the card base in fitting colours (here the road).
  • Add the slider element to the background panel, for a better movement you should add a little coin underneath the panel.
  • Adhere the background panel with 3D tape to the bardbase.
  • Add the foreground elements also with (thin) 3D pads.
Said and done. Everything went great until I checked the movement at the end of my crafting! I just recognized the car isn't driving on, but beside the road! The reason is my way of adhering the bear on the slider elements (my fix-points are in the middle between the wheels and the window). But then I decided it's not bad enough to destroy everything I did... It's an off-road  all-terrain vehicle (or SUV) now! ;-)

On importend detail:
To avoid the car rotating or spinning around you need to fix it on the coin with an oval or with two round side by side distance-elements.
:-:-:-:-:-:-:-:-:-:-:-:-:-:-:-:-:-:-:-:
:-:-:-:-:-:-:-:-:-:-:-:-:-:-:-:-:-:-:-:
Used Materials:
My Favorite Things: Stamps: Town Bear (CS-210)  /
*Stencils: selfmade DIY acetate-stencils for clouds and grass /

Colours & other stuff:
Stampin'Up exclusive Cardstock thick - whisper white (140430) /
Tsukineko: Memento - tuxedo black / Ranger: Oxide Inks & Glossy Accents / Copic: Ciao Marker / Kuretake / Zig: Wink of Stella Brush - gl. clear / 3D tape and pads / Kleberoller /
small piece of holographic foil (for the car lights) /
:-:-:-:-:-:-:-:-:-:-:-:-:-:-:-:-:-:-:-:
 Schnelle Grüße von Wiebke
Fast greetings from Wiebke
:-:-:-:-:-:-:-:-:-:-:-:-:-:-:-:-:-:-:-:

Freitag, 12. Oktober 2018

A-15 - Baby-Karte *Toni

Arbeiten mit Schablonen und Pasten mag ich ja sehr gerne! Inwischen werkel ich auch immer häufiger mal mit Schablonen und Farben!
Wenn es in der Firma, in der mein Mann arbeitet, etwas zu feiern gibt, werd ich oft gefragt, ob ich dafür eine große DinA5 Karten basteln kann, damit auch alle Kollegen Platz zum Unterschreiben haben...
Jetzt gab es gleich zweimal Nachwuchs (keine Geschwister)! :-)
Diese Otter-Karte hab ich für "Toni" gemacht und die kleine "Lea Tira" bekommt diese Bären-Karte.

:-:-:-:-:-:-:-:-:-:-:-:
Crafting with stencils and pastes is a big love of me! Meanwhile I started also to use stencils and just colors together!
When there is something to celebrate in the company where my husband is working, they often ask me if I could make a big card in DinA5 (21x14,8 cm) with enough space for all colleagues to sign...
Recently there were two babies born (no siblings)! :-)
This otter-card I made for "Toni" and little "Lea Tira" will get this bear-card.
:-:-:-:-:-:-:-:-:-:-:-:-:-:-:-:-:-:-:-:
A-15 - Baby Toni 

A-15 - Baby Toni - closed flap

A-15 - Baby Toni - opened flap

A-15 - Baby Toni - embossed Sentiment

A-15 - Baby Toni - "water surface" and waves
:-:-:-:-:-:-:-:-:-:-:-:-:-:-:-:-:-:-:-:
A-15 - Baby Toni - masked otters

Über die Karte:
Mein Mann hatte sich gewünscht, dass ich für diese Karte das Otter-Stempel-Set einweihe. Gesagt - getan! 
Klar, dass man, wenn man Otter auf die Karte bringt auch Wasser braucht! Und mein liebstes Material, um Wasser darzustellen ist nach wie vor die Embossing Paste mit Hologramm-Effect! Diesmal hab ich nicht die Paste eingefärbt, sondern erst meine Otter gestempelt und maskiert, dann den Hintergrund mit Oxide Inks und BlendingTool gestaltet und im Anschluß daran mit einer Wellen (oder eher curved lines) Stencil die glitzernde Paste aufgetragen. 
Wichtig: Man sollte die maskierten Bereiche anschließend recht zügig wieder freilegen, da sich sonst beim Trocknen unschöne Verklebungen ergeben können. Als Abschluß der Wasserfläche hab ich zwei Reihen Wellen mit einem Papierband und mit Hilfe der Stencil aufgeklebt, die untere davon mit Distress Oxide Ink und einem feuchten Pinsel eingefärbt. Sentiment heiß embosst und die Buchstaben für den Namen Toni ausgestanzt, beglittert und dann aufgeklebt. Einige gelbe Fischchen beleben die Szene noch etwas.

Zu meiner Idee für die Karte passt das "Lift the Flap" Stanzen-Set ganz wunderbar dazu! Nötig war hier nun etwas Vor-Planung, was wohin kommt, damit nachher das Bild in der geöffneten Klappe exakt zum Rest passt! Ein tolles Hilfsmittel ist da jede Art von Stempel-Positionierer!. Ich verwende die "Stamp Platform" von Tim Holtz für größere Projekte und den "Stamp perfect" von Hampton Art bei kleineren Arbeiten.
Das Ausrichten der Stencil auf genau die selbe "Wellenlänge" finde ich wichtig, damit zeigt man dem Empfänger auch, dass man sorgfältig geplant & gearbeitet hat!
Die Schritte stempeln, maskieren, inkblending und schließlich Embossing Paste auftragen sind genau gleich wie beim ersten Mal, nur dass eben nur der kleine Bereich hinter der Klappe bearbeitet werden musste.
Nachdem alles getrocknet war, hab ich nur noch meinen Otter-Teich mit 3D Tape auf der Kartenbasis befestigt.
:-:-:-:-:-:-:-:-:-:-:-:
About this card:
My husband had a wish for the card: first use of these cute otter stamps. Said and done!
Sure, when you wanna put otters onto your card, you also need some water. My always beloved material to create water is still the embossing paste with hologramm effect! This time I hadn't colored it, but I first stamped and masked the critters, then blended the background with Distress Oxide Inks and then I used a wave (or better curved lines) stencil and my sparkling paste to create the final look of the water.
Important: You should remove the masking-papers right after you finished the stencil work to avoid ugly bonding of paste and paper. To finish the surface of the water I adhered two rows of paper-ribbon with the help of the stencil, the lower one I colored with Oxide ink and a moistly brush. The sentiment is heat embossed and theletters for the name Toni were die cut and then covered with embossing paste as well. Some yellow fish spread life and happiness.

My idea for the card was perfect for the use of the "Lift the Flap" die-set. But I had to do some extra planning for positioning everything to get a seamless picture in front and behind the flap.
A stamping positioning tool is a great help here! I use the "Stamp Platform" from Tim Holtz for bigger projects and the smaller "Stamp perfect" from Hampton Art for small works.
Also the position of the stencil to the same "wavelength" is important, so you can show the recipient of the card you plan and create careful!
The steps of stamping, masking, ink blending and finally adding embossing paste are the same as beforre, only difference is the size of the area you work in, now it'S only the small area beneath the flap.
After everything was dried I put my otter lake with dimensional tape onto my cardbase.
:-:-:-:-:-:-:-:-:-:-:-:-:-:-:-:-:-:-:-:
Entered in these Challenges:
:-:-:-:-:-:-:-:-:-:-:-:-:-:-:

Make My Monday Challenge Blog
Make My Monday Challenge #81 - Animals
→ An otter-family and some fishes.
:-:-:-:-:-:-:-:-:-:-:-:-:-:-:-:-:-:-:-:
Verwendete Materialien: 
Create A Smile: Stamps: Willkommen Baby & Stencil: Curved lines /
Lawn Fawn: Dies: Lift the flap (LF1439), Quinn's capital ABCs (LF589) /
My Favorite Things: Stamps: Otterly love you (BB-42) /

Farben & Sonstiges:
Ranger: Distress Oxide Inks - peacock feather, broken china, mermaid lagoon, salty ocean & Blending Tool  & Multi Medium matte /
Copic: Ciao Marker - Y15, Y17, YR16 /
Stabilo: Marker Pen 68 - braun, grau /
Stampin'Up: extrastarker Farbkarton - Fl.weiß (140490) /
ImH: Hologramm Eiskristall Lack + Spachtel / Sakura: Gelly Roll 08 - white / Faber Castell: Pitt artist pen, S, SB - black / non-permanent tape-roller / 3D Tape 2 mm / Tombow Glue /
:-:-:-:-:-:-:-:-:-:-:-:-:-:-:-:-:-:-:-:
{Verborgene} Grüße, Eure Wiebke.
{Hidden} greetings from Wiebke.
:-:-:-:-:-:-:-:-:-:-:-:-:-:-:-:-:-:-:-:

A-14 - Baby-Karte *Lea Tira

Arbeiten mit Schablonen und Pasten mag ich ja sehr gerne! Inwischen werkel ich auch immer häufiger mal mit Schablonen und Farben!

Wenn es in der Firma, in der mein Mann arbeitet, etwas zu feiern gibt, werd ich oft gefragt, ob ich dafür eine große DinA5 Karten basteln kann, damit auch alle Kollegen Platz zum Unterschreiben haben...
Jetzt gab es gleich zweimal Nachwuchs (keine Geschwister)! :-)
Die Bären-Karte bekommt "Lea Tira" und "Toni" diese Otter-Karte.
:-:-:-:-:-:-:-:-:-:-:-:
Crafting with stencild and pastes is a big love of me! Meanwhile I started also to use stencils and just colors together!

When there is something to celebrate in the company where my husband is working, they often ask me if I could make a big card in DinA5 (21x14,8 cm) with enough space for all colleagues to sign...
Recently there were two babies born (no siblings)! :-)
The bear-card is for a girl named "Lea Tira" and a boy named "Toni" will receive this otter-card.
:-:-:-:-:-:-:-:-:-:-:-:-:-:-:-:-:-:-:-:
A-14 - Baby Lea Tira
A-14 - Baby Lea Tira - Detail bear
A-14 - Baby Lea Tira
A-14 - Baby Lea Tira - Inside - hidden twine ends
:-:-:-:-:-:-:-:-:-:-:-:-:-:-:-:-:-:-:-:
Über die Karte:
Regenbögen sind super! Sie sind bunt und fröhlich und daher bestens geeignet für Kinder jeden Alters!
Für die kleine Lea Tira hab ich zum einen einen Regenbogen mit Stencil, Oxide Inks und Blending Tool gestaltet und dazu noch einen zweiten aus gestanzten Mini-Tags. Bei den Tags hab ich eine Art Farbverlauf simuliert, indem ich jeweils zwei Tags zusammen an der Schnur befestigt hab und das Herz in der Mitte bereits aus dem nächsten Tag-Duo kam.
Der Bär ist mit verschiedenen Brauntönen koloriert.
Um noch ein gewisses Extra auf die Karte zu bringen, ohne damit aber "optische Unruhe" zu erzeugen, hab ich dem Bären noch einige Luftballons in die Tatze gegeben - sie glitzern ganz dezent in weiß.

:-:-:-:-:-:-:-:-:-:-:-:
About this card:
Rainbows are great! They are colorful and happy and they are perfect for kids of every age!
For little Leo Tira I've created two rainbows - one with stencil, oxide inks and blending tool and a second one made of little die cut tags. I simulated a color blending there by adding two different tags together to the twine and inlayed the colored heart of the next tag-duo in there.

The bear is simply colored in different shades of brown.
To put something special on the card without creating too much "optical disturbance" I gace some sparkling white balloons in the paw of the bear.
:-:-:-:-:-:-:-:-:-:-:-:-:-:-:-:-:-:-:-:
Entered in these Challenges:

Create A Smile Friends & Family  FB-Group - Challenge #10 - Stencils
→ Stencil: Create A Smile - focal point
:-:-:-:-:-:-:-:-:-:-:-:-:-:-:
Sugar Pea Designs - Mix It Up Challenge #48
→ rainbow colors and also the double ring behind the bear as part of the sketch 
(but the sketch isn't perfectly realized I know)
:-:-:-:-:-:-:-:-:-:-:-:-:-:-:
Make My Monday Challenge Blog
Make My Monday Challenge #81 - Animals
→ The bear!
:-:-:-:-:-:-:-:-:-:-:-:-:-:-:-:-:-:-:-:
Verwendete Materialien:
Create A Smile: Stencil - Focal point & Cool Cut Die -Lovely Tags M /
Technique Tuesday: Beary Sweet /
My Favorite Things: Die-namics - Stitch'l DotCircle STX /
Nellie Snellen: MultiFrames - straight round /
Artemio Punch / Picture Punch: Balloons in  small & middle /

Farben & Sonstiges:
Ranger: Distress Oxide Inks - candies apple, carved pumpkin, mustard seed, twisted citron, mowed lawn, salty ocean, dusty concord, wilted violet, seedless preserves & BleningTool & Enamel Accents - black & Multi Medium matte /
Copic: Ciao Marker - E21, E31, E33, E37, E47, E49, E29, 0 /
Stampin'Up: extrastarker Farbkarton - Fl.weiß (140490) & Glitzerpapier - Sternenschimmer (146957), Diamantengleißen (135315) /
Cardstock-Scraps / 3D Tape, 1 mm, 2 mm /
:-:-:-:-:-:-:-:-:-:-:-:-:-:-:-:-:-:-:-:
Bärige Grüße, Eure Wiebke.
Bear-hug greetings from Wiebke.
:-:-:-:-:-:-:-:-:-:-:-:-:-:-:-:-:-:-:-:

Mittwoch, 4. Oktober 2017

K1-857 - Blüten-Stola

Als ich bei der "Task for Two" die aktuelle Challenge-Vorgaben gesehen hab, war mir sofort klar, wie meine Karte dafür aussehen soll!
Meine Inspiration hierfür ist schon etwas älter, um ganz genau zu sein: Seit ihrer Fertigstellung vergingen genau 5 Jahre, 3 Monate, 3 Wochen und 3 Tage.
Diese Blüten-Stola, die ihr auf dem Bild unten sehen könnt, besteht aus über 100 unterschiedlichen Häkel-Blüten und ich hab sie mir für meine kirchliche Hochzeit gehäkelt. Unsere kleine, alte Dorfkirche ist auch im Sommer recht kühl und so beschloß ich, mir noch etwas Wärmendes für die freien Schultern zu machen. Und ja, diese Stola wärmt mehr, als man auf den ersten Blick meinen könnte. 
Ein unbezahlbares Unikat für einen wundervollen Tag!
Da die Karte ja nun einen sehr persönlichen Bezug hat, hab ich sie meinem Mann geschenkt... um ihm einfach mal so für unsere gemeinsame Zeit zu danken (inzwischen schon über 11 Jahre). ❤

When I say the new sketch & sheme on the "Task for Two Challenge" I knew immediatelly, what kind of card I want to make!
My inspiration-object is a bit older, to be exact: 5 years, 3 monthes, 3 weeks and 3 days since I finished it.
The flower-stole you can see on the picture below is made of more than 100 different crochet-flowers and I made it for the day of my wedding in our small and old village church. It's a bit cool there, also in summertime, so I decided to make something warming for my blank shoulders. And yes, it warmed perfectly, although it doesn't look so.
An invaluable unique for a wonderful day!
Cause this card has a very personal "history" I gave it to my hubby.. just to say thank you for our time together (more than 11 years now).
:-:-:-:-:-:-:-:-:-:-:-:-:-:-:-:-:-:-:-:
K1-857 - Blüten-Stola

K1-857 - Blüten-Stola
:-:-:-:-:-:-:-:-:-:-:-:-:-:-:-:-:-:-:-:
Entered in these Challenges:
Task for Two Tuesday - CHALLENGE
Task for Two Tuesday #86 - Flowers & Sketch

Task for Two Tuesday #86 - Sketch
:-:-:-:-:-:-:-:-:-:-:-:-:-:-:

Creative Friday
Creative Friday #189 - Die Cuts / Punches
→ Die-Cut: Web & Punches: Flowers
:-:-:-:-:-:-:-:-:-:-:-:-:-:-:
IT'S HERE!
Darnell's NBUS-Challenge #12
NBUS: Marianne Designs: Craftables - Web
 :-:-:-:-:-:-:-:-:-:-:-:-:-:-:
CASology #269 - Grid ( = Gitter, Netz)
→ Grid = Web = Net (right?)
:-:-:-:-:-:-:-:-:-:-:-:-:-:-:-:-:-:-:-:
Verwendete Materialien:
Here I mention some of the special products I used on this card:
Stanzen / Dies / Punches: Marianne Design: Creatables Silver Selection - (CR1408 * fishing net) /
Stamps: Stampin'Up: GG Natur-nah (131538) /

Colors & Glue: Tsukineko: Memento - Tuxedo Black / Ranger: Stickles (several) & Multi Medium Matte / Sakura: Gelly Roll 08 - white /
Sonstiges: Simon Says Stamp: sequins - pale pink (026) /
:-:-:-:-:-:-:-:-:-:-:-:-:-:-:-:-:-:-:-:
Blumige Grüße, Eure Wiebke.
Bloomy greetings from Wiebke.
:-:-:-:-:-:-:-:-:-:-:-:-:-:-:-:-:-:-:-:

Sonntag, 2. Juli 2017

A-013 - Baby-Karte *Selma Helene

Ich wurde gefragt, ob ich eine Willkommens-Karte für eine kleine Dame basteln könnte... Hier ist sie - in extra-groß!

I was asked to create a welcome-card for a little lady... Here it is - in extra-large!
:-:-:-:-:-:-:-:-:-:-:-:-:-:-:-:-:-:-:-:
A-013 - Baby-Karte * Selma

A-013 - Baby-Karte * Selma
:-:-:-:-:-:-:-:-:-:-:-:-:-:-:-:-:-:-:-:
:-:-:-:-:-:-:-:-:-:-:-:-:-:-:-:-:-:-:-:
Verwendete Materialien:
I just mention some of the special products I used on this card:

Create A Smile: CoolCuts - Lovely Tags XS / Memory Box: Alphabet Soup & Uppercase Alphabet Soup / Lawn Fawn: small stitched Rectangle Stackables ( partial die-cut enlarged rectangle) / Reverse Confetti Stamps: Bear Hugs / Copic: Ciao Markers / Stabilo: Markers Pen68 / Ranger: Stickles X-mas red /
:-:-:-:-:-:-:-:-:-:-:-:-:-:-:-:-:-:-:-:
Koala-Grüße, Eure Wiebke.
Koala-greetings from Wiebke.

:-:-:-:-:-:-:-:-:-:-:-:-:-:-:-:-:-:-:-:

Sonntag, 5. Juni 2016

K1-621 - Baby-Karte *Hauke

Bereits vor einigen Wochen hab ich diese Baby-Karte gemacht, sie aber bisher noch nicht hier auf dem Blog gezeigt.
Ein Kollege meines Mannes hat kürzlich Nachwuchs bekommen - Hauke heißt der kleine Mann. Es entstand mal wieder eine "übergroße" Karte (Kartenbreite = Din A4-Länge = 29,7 cm), damit auch alle Kollegen der Abteilung Platz zum Unterschreiben haben.

Some weeks ago I made this card for a newborn, but havn't showed it here on the blog until now.
One of the collegues of my hubby became Daddy - this card is for his little boy Hauke. It's a "oversized" card, so there's enough space for all the signatures of the whole bureau.
:-:-:-:-:-:-:-:-:-:-:-:-:-:-:-:-:-:-:-:
K1-621 - New-Born - Baby-Karte

K1-621 - New-Born - Baby-Karte - Detail Bären

K1-621 - New-Born - Baby-Karte - Detail → Elefanten

K1-621 - New-Born - Baby-Karte - Detail → Eulen
:-:-:-:-:-:-:-:-:-:-:-:-:-:-:-:-:-:-:-:
Entered in these Challenges:
:-:-:-:-:-:-:-:-:-:-:-:
Simon Wednesday Challenge Blog
Simon Says Stamp Wednesday Challenge #371 - Mask it
 → I masked every one of the three little animal-couples to created the background.
:-:-:-:-:-:-:-:-:-:-:-:-:-:-:-:-:-:-:-:
Verwendete Materialien:
* Papiere:
Stampin'Up: extrastarker Farbkarton - Füsterweiß (140490) & exclusiver Farbkarton Pergament = exclusive Cardstock Vellum (106584) / K.Engeltje: Cardstock - hellblau / Masking-Paper (Post-its) /
* Werkzeug:
Grundausstattung: Schere, Lineal, Zirkel, Falzbein (Holz), …/
Geräte: Fiskars: SureCut / Martha Stewart: ScoreBoard / ProvoCraft: Cuttlebug V2 + ABC & Memory Box: metal adapter plate /
Stanzen / Dies & Punches: Lawn Fawn: LawnCuts - Small Stitched Rectangle Stackables (LF768) / My Favorite Things: Die Namics - Bright Lights Alpha (MFT448) / Fiskars: Lochzange 1/16“ /
Stempel / Stamps: Acrylblock / Hero Arts: OWH - Lil Hoot (CL755)/ Stampin'Up: Confetti (120465), Gorgeous Grunge (130517) → Mond / Lawn Fawn: Trim the Tree (LF564), Sweet Christmas (LF426) /
* Farben, Kleber & Co:
Tsukineko: Memento Ink - Tuxedo Black (ME-900) / Lukas: Aquarellfarben & Pinsel & H2O / Ranger: Ink-Blending-Tool & Distress Ink - squeezed lemonade, mustard seed, scattered straw, vintage photo, aged mahagony, tumbled glass, broken china, faded jeans, chipped sapphire, shabby shutters, mowed lawn, pine needles & Enamel Accents - black (GAC26969) / Sakura: Gelly Roll 08 - black, metallic gold / 3D-Pads - 2x10x10 mm, clear 1x5x5 mm / Art Idee: Transparentpapier-Kleber (= glue for vellum) /
:-:-:-:-:-:-:-:-:-:-:-:-:-:-:-:-:-:-:-:
Süße Grüße, Eure Wiebke.  
Cute greetings from Wiebke. :-:-:-:-:-:-:-:-:-:-:-:-:-:-:-:-:-:-:-:

Freitag, 6. März 2015

K1-364 - Princess Vivien

Die Geschichte:
O.K.es ist nicht wirklich Prinzessin Vivien. 
(Gibt es überhaupt eine Prinzessin mit diesem Namen?)

Meine Tochter hat eine Einladung zu einem Themen-Geburtstag bekommen... mit Prinzessinen. 
Dafür sind wir nicht vorbereitet! Wir haben eine große Verkleidungs-Kiste... die meisten Kostüme sind Tiere z.B. Wellensittich, Tiger, Eisbär, Gepard, ... (meine Schwiegermutter hat sie alle vor vielen Jahren genäht). Kein einziges Feen- oder Prinzessinen-Kostüm, nicht mal eins für einen Frosch! Und der Drache ist noch viel zu groß für so ein kleines 4,5 jähriges Mädchen! 
Und noch dazu ist die Faschings-Zeit ja eben erst zu Ende gegangen, vielleicht hätten wir ja da noch ein Schlussverkaufs-Schnäppchen ergattern können???
Jetzt brauchen wir nur noch (ganz dringend!!!) etwas zum Anziehen für morgen. - Ich denke, ich werde heute Abend / Nacht nicht mit Papier basteln... sondern königliche Gewänder schneidern. Ich hoffe, ich bekomme aus den Sachen, die ich so hier habe was Nettes gezaubert...
Überzeugt mich mit Kommentaren davon, dass ich euch das fertig verkleidete Party-Girl hier zeigen soll. :-)

The Fairy-Tale:
O.K. she isn't really Princess Vivien. 
(Is there actually a princess with this name?)

My daughter was invited to a themed birthday... with princesses. We are not prepared for this! We have a big box of costumes... most of them are animals - like budgerigar, tiger, polar bear, cheetah, shark, ... (my mother-in-law sew all of them years ago). No costume for a fairy or a princess, neither for a frog! And the dragon is still much to big for a 4,5 year old girl!
In additon the carnival-time just endet short time ago, maybe we could have caught a bargain in the sale???
Now we only need (urgently!!!) something to put on for tomorrow.  - I think I won't be paper-crafting tonight... I will sew royal clothes. Hope I will get something nice out of my stuff here...
Convince me with your comments to add a pic of the little party-girl here. :-)

Diese Karte hab ich für die kleine Dame gemacht (ihr Name ist Vivien - daher der Titel)!
I prepared this card for the little lady (her name is Vivien - the reason for the card-title).
:-:-:-:-:-:-:-:-:-:-:-:-:-:-:-:-:-:-:-:
K1-364 - Princess Vivien
:-:-:-:-:-:-:-:-:-:-:-:-:-:-:-:-:-:-:-:
Nachtrag/Addition:
This pic is for Judith (and everybody who loves happy little girls!)

Princess Stella

Stella decided to be a princess of the ocean (cause the skirt "looks like water") and took her glitter-turtle-shirt to complete the costume. 
She told me, the skirt shouldn't be too long, only down to the calves, not more! Most of the decisions I made directly when I was sewing. - One of them was: let the front-area "open" to give this active child a chance to run around without struggling with the cloth. 
The personal i-dot for me is the little crown. I crochet it without any instruction (like I do most of the time when I start something new) with thick textile-yarn (there is a wire to hold the form).

Stella was happy with this costume (although the other girls all had these glitter-glimmer-costumes - some in pink, one in purple and two blue icy ladies).
She was so proud of it, cause she knew I made it special for her.... She is such a SWEETY!
:-:-:-:-:-:-:-:-:-:-:-:-:-:-:-:-:-:-:-:
Entered in these Challenges:
Simon Wednesday Challenge Blog
SimonWednesday - Week10 - Special Lady / Girl (2)
:-:-:-:-:-:-:-:-:-:
Creative Friday #123 - girly (1)
:-:-:-:-:-:-:-:-:-:-:-:-:-:-:-:-:-:-:-:
Verwendete Materialien:
Papiere:
Craft UK limited: 5“x5“ white cards (250 gsm) & envelopes (100 gsm) / K.Engeltje: Cardstock - Gelbtöne / smooth Cardstock /
Werkzeug: 
* Grundausstattung: Schere, Lineal, Zirkel, Falzbein (Holz), … /
* Geräte: Fiskars: SureCut / ProvoCraft: Cuttlebug V2 + ABC & Memory Box: metal adapter plate /
* Stanzen / Dies & Punches: Lawn Fawn: LawnCuts – Spring Showers (LF657) / We R Memory Keepers: Corner Chomper - 1/2“ /
* Stempel / Stamps: Acrylblock / Waltzing Mouse Stamps: Heroines - Fairy Princess /
Farben: Tsukineko: Memento Ink - Tuxedo Black (ME-900) / Copic Ciao Marker - diverse E- und B- Töne / Stabilo: Pen 68 - Marker (grün 33, 36 / rot 48) / Ranger: Glossy Accents (GAC17042), Glitz Stickles - Champagner (SUS25078) / white (GAC26976) / Kuretake / ZIG: Wink of Stella Brush - Gl.clear (999) /
Kleber & Co: Kleberoller / Aleene's Tacky Glue / Fast Grab Tacky Glue /
Sonstiges: ImH: Rhinestones, Tropfenform = drop-shaped - hellblau / Organza-Band, 4 mm - grün /
:-:-:-:-:-:-:-:-:-:-:-:-:-:-:-:-:-:-:-:
  Hoheitliche Grüße, Eure Wiebke.
  Sovereign greetings from Wiebke.
:-:-:-:-:-:-:-:-:-:-:-:-:-:-:-:-:-:-:-: