Posts mit dem Label Embossing werden angezeigt. Alle Posts anzeigen

Donnerstag, 3. November 2022

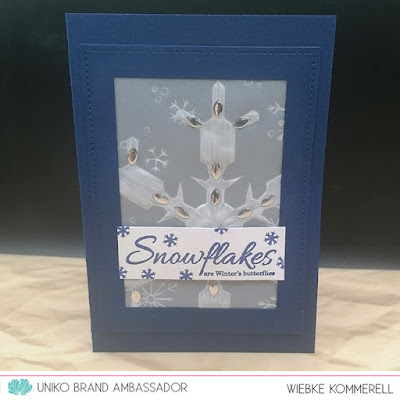
K1-1635 - Embossed Large Snowflake / Uniko Release Day #1

Heute ist Stencil Release Day bei Uniko!
Denkt dran, wer in den Sozialen Medien fleißig die Karten der Brand Ambassadors kommentiert, bekommt die Chance, einen tollen Sachpreis zu Gewinnen! Alle Infos dazu findest du hier!

:-:-:-:-:-:-:-:-:-:-:-:

Today it's Stencil Release Day at Uniko!
Don't forget the great Giveaway of Supplies. You get a chance to be the lucky winner, when you comment the cards of the Brand Ambassadors on Social Media. All information about it you can find here!

:-:-:-:-:-:-:-:-:-:-:-:-:-:-:-:-:-:-:-:
KomMa-designed_K1-1634_EmbossedLargeSnowflake_#1
K1-1635 - Embossed Large Snowflake
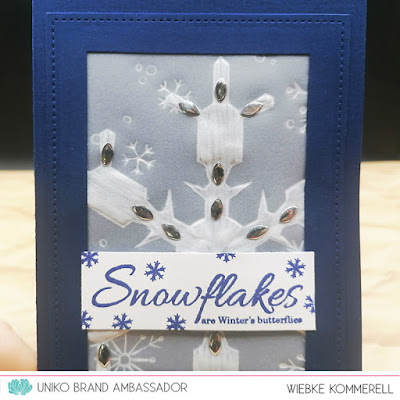
KomMa-designed_K1-1634_EmbossedLargeSnowflake_#2
K1-1635 - Embossed Large Snowflake
KomMa-designed_K1-1634_EmbossedLargeSnowflake_#3
K1-1635 - Embossed Large Snowflake
KomMa-designed_K1-1634_EmbossedLargeSnowflake_#4
K1-1635 - Embossed Large Snowflake - Inside of the card
:-:-:-:-:-:-:-:-:-:-:-:
Uniko - Stencil - MOD Background Builder
Uniko - Stencil - Flower Power #6
Uniko - Stencil - Large Snowflake #1
Uniko - Stencil - Large Snowflake #2
:-:-:-:-:-:-:-:-:-:-:-:-:-:-:-:-:-:-:-:
Uniko Studio
Used Materials:
Uniko: Stencil: Large Snowflak #1 & Stamps: Stunning Snowflakes & Big & Bold - Snow 
Embossing-Pencils (with globes at the end) & Mouse-Pad /
 
Colours & other stuff:
Cardstock - dark blue, white / Vellum /
Ranger: Distress Ink - chipped sapphire /
double sided sticky tape / Kleberoller /
ImH: Hotfix, Metall Nieten - silver /
Uniko - Stencil - Large Snowflake #1
Uniko - Stamps - Stunning Snowflakes
Uniko - Stamps - Big & Bold - Snow
:-:-:-:-:-:-:-:-:-:-:-:-:-:-:-:-:-:-:-:
Flockige Grüße von Wiebke
Flaked greetings from Wiebke
:-:-:-:-:-:-:-:-:-:-:-:-:-:-:-:-:-:-:-:

Montag, 21. Februar 2022

K1-954 - Mandala Danke / UNIKO 10th Birthday Celebration / CASE

Noch eine weitere Karte aus meinem Uniko-Repertoire.
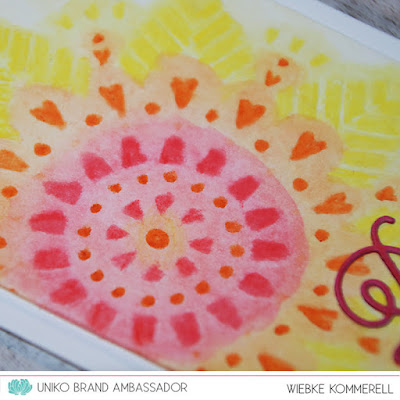
Diesmal hab ich die Mandala-Stencil zum Embossen von Aquarellpapier verwendet. Anschlißend hab ich die erhabenen Areale mit Aquarell-Buntstiften koloriert and die Farben dann mit purem Wasser vermalt.

:-:-:-:-:-:-:-:-:-:-:-:

Another card of my Uniko repertoire.
This time I used the Mandala stencil to emboss watercolour paper. Then I coloured the embossed areas with watercolour pencils and painted them with pure water.

The translation of the German word "Danke" is "Thanks".

KomMa-designed_K1-954_MandalaDanke#3
:-:-:-:-:-:-:-:-:-:-:-:-:-:-:-:-:-:-:-:
KomMa-designed_K1-954_MandalaDanke#1
K1-954 - Mandala Danke
KomMa-designed_K1-954_MandalaDanke#2
K1-954 - Mandala Danke - Detail

:-:-:-:-:-:-:-:-:-:-:-:-:-:-:-:-:-:-:-:
Here I list all the special postings of Unikos 10th Birthday Event for you - check them out if you havn't done it yet!
And don't forget to participate in the HUGE contribution to win one of the amazing prices Bev announced on the Uniko Blog!

Alumni "CASE Myself Event" 

CASE #1: Beverley
CASE #2: Linda Walmsley
CASE #3: Sandie Munro
CASE #4Deborah Frings
CASE #5Sarah Platt
CASE #6Lindsey Bowe
CASE #7Aimes
CASE #8: Keren Baker
Extra CASE: Wiebke
CASE #9: Carol Mayne
CASE #10: Ren-Yi

:-:-:-:-:-:-:-:-:-:-:-:

Hier sind die Links zu den Aufgaben / Here are the links to the Quests:
Quest #1: 🎉🎈
Eine Geburtstagskarte mit Uniko-Produkten herstellen! 
Create a birthday card with Uniko products! 
→ use Linkup-Tool in Quest #1 posting 
Quest #2: 
Such dir 10 Begriffe aus die Uniko-Produkte für dich beschreiben (bitte in englisch). 
We ask you to think of 10 words to describe Uniko products.
→ write comment in Quest #2 posting 
Quest #3: 
Beantworte die 10 Quizfragen 
Answer the 10 quiz questions 
→ Mail to bev@uniko.co.uk → subject "Uniko Quiz" 
Quest #4:
Entschlüssle den Code 
Crack the Code 
 Mail to bev@uniko.co.uk  subject "The Code" 
Quest #5:
Ordne 10 Produktbilder den Jahren ihrer Erst-Veröffentlichung zu. 
Match 10 product pictures to the years they were first released. 
→ Mail to bev@uniko.co.uk → subject "Year" 
EXTRA:
Großer Sonderpreis 
Huge Prize Package 
Quest #6: 
Eine weitere Karte mit Uniko-Produkten herstellen -  die Karte von Quest #1 darf hier nicht erneut geposted werden! 
Create a new card using Uniko products - it's not allowed to post the card of Quest #1 here again! 
→ share it on Instagram using the tag #Uniko10 
Quest #7:   
Das ist eine sehr lustige Aufgabe! / That's a very funny one! 😂
Bilder von uns BrandAmbassador-Teammitgliedern, als wir etwa 10 Jahre alt waren, den Bildern von heute zuordnen. - Klingt das einfach? 
Match up pictures from the BA-Team when we were about 10 years old with pics of today! - That's easy? 
→ Mail to bev@uniko.co.uk  subject "Match up" 
Quest #8: 
Wörter-Suchspiel, finde 10 Stencil-Namen.
Word search of 10 Uniko Stencil names.
→ Mail to bev@uniko.co.uk → subject "Search" 
Quest #9:
Ergänze in 10 Stempelset Namen die fehlenden Vokale.
Add the missing vowels to the 10 Stamp Set names.
→ Mail to bev@uniko.co.uk → subject "Missing vowels"
Quest #10:
Identifiziere 10 Uniko Produkte.
Identify 10 Uniko products.
→ Mail to bev@uniko.co.uk → subject "Close Ups"
:-:-:-:-:-:-:-:-:-:-:-:-:-:-:-:-:-:-:-:
Uniko Studio
Used Materials:
Uniko: Stencil: Mehndi Mandala 
Memory Box: Dies: Danke Cursive (No.99049) / 


Colours & other stuff:
Stampin'Up: NoteCard, 12,7 x 9 cm + Envelope - whisper white (131527 / Aquarellpapier = Watercolour Paper / Cardstock scrap - pink / 
Aquarell-Buntstifte = Watercolour Pencils / Ranger: Multi medium matte / 
3D Tape, 1 mm / 
:-:-:-:-:-:-:-:-:-:-:-:-:-:-:-:-:-:-:-:
Dankbare Grüße von Wiebke
Thankful greetings from Wiebke
:-:-:-:-:-:-:-:-:-:-:-:-:-:-:-:-:-:-:-:

Freitag, 3. September 2021

K1-1213 - Lucky Dice

Hier kommt die Spielerin in mir durch!

Here you see the boardgamer in me!
:-:-:-:-:-:-:-:-:-:-:-:-:-:-:-:-:-:-:-:
KomMa-designed_K1-1213_LuckyDice#1
K1-1213 - Lucky Dice

KomMa-designed_K1-1213_LuckyDice#2
K1-1213 - Lucky Dice

KomMa-designed_K1-1213_LuckyDice#3
K1-1213 - Lucky Dice - Detail sentiment
:-:-:-:-:-:-:-:-:-:-:-:-:-:-:-:-:-:-:-:
Entered in these Challenges:

AAA Cards #197 - One Inch Strip
The Dice-Strip is meassuring 2,6 cm = 1 inch,
only the sentiment is placed separately.
:-:-:-:-:-:-:-:-:-:-:-:-:-:-:-:-:-:-:-:

Used Materials:
Craft Emotions: Dies: Good Luck! /

Colours & other stuff:

folded cardbase A6 - white / scraps of Cardstock - black, many colors /
silicone embossing mat /
Sakura: Gelly Roll - white / Kuretake/Zig: Wink of Stella Brush - gl.clear / Ranger: Glossy Accents & Multi medium matte /
Tombow / 3D-Pads 2mm /
 
:-:-:-:-:-:-:-:-:-:-:-:-:-:-:-:-:-:-:-: 
 Glückliche Grüße von Wiebke  
Lucky greetings from Wiebke 
 :-:-:-:-:-:-:-:-:-:-:-:-:-:-:-:-:-:-:-:

Montag, 16. November 2020

K1-1234 - Merry Kissmas II

Bei Create A Smile läuft seit heute die dritte Woche der #10minchristmascards (16.-22.11.). Diesmal mit dem Fokus auf DieCut = Stanzen.

:-:-:-:-:-:-:-:-:-:-:-:

At Create A Smile the third week of #10minchristmascards (Nov. 16.-22). This time the focus is on diecuts.
:-:-:-:-:-:-:-:-:-:-:-:-:-:-:-:-:-:-:-:
Wiebke Kommerell - KomMa-designed - K1-1234
K1-1234 - Merry Kissmas
Wiebke Kommerell - KomMa-designed - K1-1234
K1-1234 - Detail Mistletoe
Wiebke Kommerell - KomMa-designed - K1-1234
K1-1234 - Detail Sentiment
:-:-:-:-:-:-:-:-:-:-:-:-:-:-:-:-:-:-:-:
Im Gegensatz zur ersten Kissmas-Karte stehen diesmal ausgestanzte Elemente im Vordergrund - der Mistelzweig und auch die großen, Outline-Buchstaben für das KISS.
Das Textfeld ist leicht erhaben aufgeklebt und die Beeren der Mistel mit Nuvo-Drops plastisch gestaltet.
Das rote Band ist wie auch bei der vorherigen Karte schon ein Blickfang und zugleich zeigt es die Farbe der Liebe...
:-:-:-:-:-:-:-:-:-:-:-:
In contrast to the first Kissmas-card die-cut elements are the focal point this time -the mistletoe and also the big outlined letters for the KISS.
The sentiment-area is raised a little bit and the berries of the Mistle are created dimensional with the help of Nuvo-Drops.
The red ribbon catches the eye like it did in the previous card and is also shows the colour of love... 
:-:-:-:-:-:-:-:-:-:-:-:-:-:-:-:-:-:-:-:
Entered in these Challenges / Showed here:

Instagram & Facebook: #10minchristmascard
(organised from Create A Smile)
:-:-:-:-:-:-:-:-:-:-:-:-:-:-:-:-:-:-:-:

Used Materials:
Create A Smile: Dies: Alphabet Cherry lowercase /
Craft Emotions: Dies: Holly & Mistletoe /
Uniko: Stamps: Simply said Christmas /

Colours & other stuff:
folded cardbase A6 - white / Cardstock - white, green (scraps) / 
Tsukineko: VersaFine - onyx black & VersaMark Ink / Reprint: Embossing Powder - silver pearl / Tonic Studios: Nuvo crystal drops gloss - simply white / Ranger: Multi Medium matte /
3D-Pads, 1 mm / Satinband, 3 mm - rot / 
:-:-:-:-:-:-:-:-:-:-:-:-:-:-:-:-:-:-:-:
Verliebte Grüße von Wiebke
Fongreetings from Wiebke 
:-:-:-:-:-:-:-:-:-:-:-:-:-:-:-:-:-:-:-:

Freitag, 2. Oktober 2020

K1-1416 - embossed Thank You / Uniko Challenge #61 Reminder

Can you believe it? It's already October now and it's time for the Reminder Post for the current Uniko-Challenge  #61! It's an Anything Goes Challenge with the optional twist "Thanks".

I hope, every one of you has a reason to say thanks right now! Thanks to someone who was or still is there for you, to take care, to talk when you feel bad, to encourage or inspire you, to make you laugh or just to feel needed!
If there isn't anybody special, use the season to be inspired! It's harvest time, the time for beeing thankful! 

To see all the inspirational cards of the other Uniko Brand Ambassadors and our Guest Designer Ishani, please hop to the Reminder post on the Uniko-Blog.

The challenge will end on Friday, 23rd October 2020 (7.00pm EDT) so there is still lots of time to craft a bit,share your art with us and maybe win one of 6 great prizes!

:-:-:-:-:-:-:-:-:-:-:-:-:-:-:-:-:-:-:
Wiebke Kommerell - KomMa-designed - K1-1416#1
K1-1416 - Thank You

Wiebke Kommerell - KomMa-designed - K1-1416#2
K1-1416 - Detail of colourful embossing powder

Wiebke Kommerell - KomMa-designed - K1-1416#3
K1-1416 - Detail of the doubled embossing technique

:-:-:-:-:-:-:-:-:-:-:-:-:-:-:-:-:-:-:-:
The technique I used for this card I've seen some weeks before in a YouTube video of Jennifer McGuire. She called it "embossed impressions" I think. 
It was a bit tricky and needed some tries until I was almost happy with the result, but these heat embossed thin lines on the die-embossed paper look great, don't they?
Yes, you read it correct! 
First I impressed the paper with a cutting die (and a silicone matte) with VersaMark on the cutting-edges (just there and nowhere else!), then I put embossing powder over it and heat embossed this to melt into the impressed lines. How cool is this?

For my card I used a left-over colourful mix of embossing powders (all from Zing!) I also heat embossed the sentiment and some little punched circles with the same powder.
To get a bit of "real" colour I put a strip of red paper beneath the cut out sentiment and cut it again.

I combined rough and smooth papers, white and (very) colourful pieces, outlined flowers and a bold sentiment, impressed areas and raised ones, glossy dots and matte paper ... 
So many contraries but in the result it is a simple and unagitated (stress-free) CAS card!
:-:-:-:-:-:-:-:-:-:-:-:-:-:-:-:-:-:-:-:
:-:-:-:-:-:-:-:-:-:-:-:-:-:-:-:-:-:-:
Uniko Studio
Used Materials:
Uniko Stamps: Dies: Kindness Blooms Dies & Stamps: All Occasion Sentiments #3 /

Colours & other stuff:
Cardbase A6 - white / Hahnemühle: thick Watercolour paper (300 g/m²) / Cardstock (scraps) - smooth white, red / 
Tsukineko: VersaMark Ink / American Crafts: Zing! Embossing Powders (DIY-Mix) / 
Ranger: Multi Medium matte & Glossy Accents / Kleberoller / 3D Pads - 2 mm & 3 mm /

:-:-:-:-:-:-:-:-:-:-:-:-:-:-:-:-:-:-:
Thankful greetings from Wiebke
:-:-:-:-:-:-:-:-:-:-:-:-:-:-:-:-:-:-:
Freitag, 5. Juni 2020

K1-1382 - Lächeln

Heute poste ich endlich mal wieder eine Karte!
Die Basis entstand bereits während der letzten Online Card Classes - Spring Card Camp, aber erst jetzt kam ich dazu, sie fertig zu stellen.
"Wer schön sein will, muss Lächeln", dazu Regenbogen-Farben und Schmetterlinge - alles zusammen in einem  CAS Style - ich bin absolut happy mit dem Ergebnis!
:-:-:-:-:-:-:-:-:-:-:-:
Today I finally post a card again!
The base I created during the last Online Card classes - Spring Card Camp, but I just find time to finish the card now.
The translation of the German sentiment "Wer schön sein will muss Lächeln" is "Who wants to be beautiful, has to smile"!
The sentiment combined with rainbow-colours and butterflies - all together in a CAS style - I'm absolutly happy with this result!
:-:-:-:-:-:-:-:-:-:-:-:-:-:-:-:-:-:-:-:
KomMa-designed - K1-1382 #1
K1-1382 - Lächeln

KomMa-designed - K1-1382 #2
K1-1382 - Lächeln

KomMa-designed - K1-1382 #3
K1-1382 - Lächeln
:-:-:-:-:-:-:-:-:-:-:-:-:-:-:-:-:-:-:-:

The background beneath the front-layer is made with Distress Oxide Inks and an iridescent embossing paste. I scored the paper with lines and then diecut the letters and just used the negative part to cover this colourful paper, so the open areas of the letters shine bright in rainbow coloursthrough the open shapes!
From a rainbow strip I cut off I punched out all the small butterflies and adhered them adjacent to the letters. On a piece of white cardstock I stamped the sentiment and fussycut it out and adhered it to the card.


:-:-:-:-:-:-:-:-:-:-:-:-:-:-:-:-:-:-:-:
Entered in these Challenges:
Addicted to CAS
Addicted to CAS #185 - Rainbow
:-:-:-:-:-:-:-:-:-:-:-:-:-:-:
CAS on Friday
CAS on Friday #181 - Animal(s)
:-:-:-:-:-:-:-:-:-:-:-:-:-:-:-:-:-:-:-:
"This list includes 
unpaid & uncommissioned advertisement!"
Used Materials:
Create A Smile: Stamps: Lächeln & Dies: Cherry - Upper case & Lower case  /
Memory Box: Dies: Butterfly delights & Dancing butterflies /

Colours & other stuff:
folded cardbase A6 - white / Canson: Imagine  Mix Media Paper /
Tsukineko: Memento - tuxedo black / Ranger: Oxide Inks / ImH: Kristall-Eis Embossing Paste /
Aleene's Tacky Glue / 3D Tape - 1 mm /
:-:-:-:-:-:-:-:-:-:-:-:-:-:-:-:-:-:-:-:
Viele Grüße von Wiebke
Many greetings from Wiebke
:-:-:-:-:-:-:-:-:-:-:-:-:-:-:-:-:-:-:-:

Sonntag, 19. April 2020

K1-1348 - embossed daffodil -II- / Uniko Brand Ambassador Post

Like I mentioned in first post of today, I was inspired from
Jennifer McGuire who showed this technique on the first day of the current Online Card Class "Spring Card Camp".
K1-1348 - embossed daffodil

https://www.onlinecardclasses.com/springcardcamp/wp-content/uploads/sites/47/2020/04/SPRSCC2020-participant.png
This is an extra long class - started Saturday, April 11th and last until Thursday, April 30th, Wrap-Up day is Thursday, May 7th. 
On every one of the 20 days you get one video with intructions and tips to create two (different) cards in almost one working process.


Two embossed daffodils

Some more information about the technique you can find in post of my first card or in the post on the Uniko Blog.

Uniko Studio

:-:-:-:-:-:-:-:-:-:-:-:-:-:-:-:-:-:-:
The second card is made with an invers impression of the embossing panel.
I softly added some Distress Oxide inks with a blending tool. The colours outside of the expressed lines makes such a soft colour effect!

This card is very simple and a bit plain right now. When I know who will get it, I think I will add a banner or rectangle layer with the sentiment in the bottom third of the flower layer.

Probably with the Simply Said Blocks from Uniko in the colours of one of the two Oxide Ink colours I used for the flower.

K1-1348 - embossed daffodil - Detail
:-:-:-:-:-:-:-:-:-:-:-:-:-:-:-:-:-:-:
Here you can jump to the first card I showed today.
K1-1347 - embossed daffodil - Detail
:-:-:-:-:-:-:-:-:-:-:-:-:-:-:-:-:-:-:
When you use an embossing powder what doesn't "want" to layer thick enough - don't give up! Use this first try, colour it as usual and make a card out of it.
And then make a second try of the layering with another embossing powder (and maybe another brand of paper).

My first one was clear powder from Ranger - and it stayed flat. Why? I still don't know!
The second try was with a white powder from efco (one of my oldest powders in the box) on a different paper. And this turned out great!
I will use it some more times to get impressions and then I will use it as "normal" embossed image on a card - so nothing is wasted! :-)
:-:-:-:-:-:-:-:-:-:-:-:-:-:-:-:-:-:-:
Used Materials:
for the embossing panel:
Uniko Stamps: Stamps: Spring Botanicals /
Cardstock - white / Tsukineko: VersaMark Ink / efco: embossing powder - white /

Colours & other stuff:
Cardbase A6 - white / Watercolour paper (122959) /
Ranger: Distress Oxide Inks - fossilized amber, mowed lawn /
Kleberoller /
:-:-:-:-:-:-:-:-:-:-:-:-:-:-:-:-:-:-:
Hugs & greetings from Wiebke
:-:-:-:-:-:-:-:-:-:-:-:-:-:-:-:-:-:-:
  Hope these cards inspire you to try this technique too!
Have a good time, stay at home and healthy and be creative! 
😀

K1-1347 - embossed daffodil -I- / Uniko Brand Ambassador Post

Was very silent here on my blog for so many weeks - sorry!
But the Pandemic with all the stuff happening during the last weeks kept me away from my crafting table...

Home schooling, new organisation of our everyday life (with 6 person in the house almost 24/7 - that costs lots of nervs sometimes!), long phone calls with family and friends, start of the garden season with all the work outside (planting and seeding), all the time you need to stay half-way informed about all the things happen ouside of the "little safe world" of our house...

And yes, my creativity was gone for a while with all the bad stuff in the newspapers every day from all around the world...

Hope my creative mind is back now!
And I hope I'll find some time to craft - primary schools will be closed for minimum two more weeks here in Brandenburg and kindergarden probably until August (poor Milo, he is missing the time there so badly!)

:-:-:-:-:-:-:-:-:-:-:-:-:-:-:-:-:-:-:
Easter time is over, but in my garden the daffodils (the translated German name "Osterglocke" is "Easter bells") just started to bloom. So I decided to show you some cards with these beautiful spring flowers from Uniko today!

K1-1347 - embossed daffodil
:-:-:-:-:-:-:-:-:-:-:-:-:-:-:-:-:-:-:
two embossed daffodil cards
:-:-:-:-:-:-:-:-:-:-:-:-:-:-:-:-:-:-:
The technique I used was a first try for me.
Jennifer McGuire showed it on the first day of the current Online Card Class "Spring Card Camp".

https://www.onlinecardclasses.com/springcardcamp/wp-content/uploads/sites/47/2020/04/SPRSCC2020-participant.png
This is an extra long class - started Saturday, April 11th and last until Thursday, April 30th, Wrap-Up day is Thursday, May 7th. 
On every one of the 20 days you get one video with intructions and tips to create two (different) cards in almost one working process.
:-:-:-:-:-:-:-:-:-:-:-:-:-:-:-:-:-:-:
The technique I used may be a bit tricky in the first try, but when you managed it successfully, it's easy to repeate and re-use the panel(s) you created many times!

You make your own embossing panel by layering a heat embossed image 10(!) times - layer over layer. The use of a stamping tool helps to get the best possible same-spot stamping.
This thick heat-embossed image allows you, to use it like an embossing folder.

For best results I had to experiment a little bit with my cutting machine and the layers I needed for the embossing. 
At the beginning I was a bit too careful, cause I was afraid to break this heat-embossed image with too much pressure (but everything went well - it looks still the same, ready to use it again).

For my Cuttlebug I used 1x A-plate + 2x B-plates + 1x silicone embossing-matte + the created Embossing Panel + Paper/Cardstock to emboss in + additional Cardstock-Layers
The additional Cardstock-layers depended to the thickness of the watercolour paper I used. 

Watercolour paper has some positive properties to use it with this technique. 
The first one is, you can moisturise it without any risk before you start to emboss - the impression of your embossing panels (or folders) will be better on dampish paper than on dry paper!
The quality of watercolour paper is often softer and thicker than most other papers - also a benefit fort the embossing.
And last but not least you can use watercolours after you have embossed it!
:-:-:-:-:-:-:-:-:-:-:-:-:-:-:-:-:-:-:
The first card I made with an impressed embossed flower.
I coloured the impressed lines of the flower with Zig Real brushes and added some water for a good colour gradient to the areas beside.

A still missing (small) sentiment will be placed right between the green ribbons on the right side of the flower or (when I'll use a bigger one) on the inside of the card.
I hope I can use it as a birthday card and don't need many get well cards soon. (Nobody should be in the situation to need one during the next weeks! So please stay save!)

K1-1347 - embossed daffodil - Detail
:-:-:-:-:-:-:-:-:-:-:-:-:-:-:-:-:-:-:-:
For my second card I used a second embossed daffodil - this time the inverse impression. Hop there to see the full card or see it on the Uniko Blog.
K1-1348 - embossed daffodil - Detail
:-:-:-:-:-:-:-:-:-:-:-:-:-:-:-:-:-:-:-:
When you use an embossing powder what doesn't "want" to layer thick enough - don't give up! Use this first try, colour it as usual and make a card out of it.
And then make a second try of the layering with another embossing powder (and maybe another brand of paper).

My first one was clear powder from Ranger - and it stayed flat. Why? I still don't know!
The second try was with a white powder from efco (one of my oldest powders in the box) on a different paper. And this turned out great!

I will use it some more times to get impressions and then I will use it as "normal" embossed image on a card - so nothing is wasted! :-)
:-:-:-:-:-:-:-:-:-:-:-:-:-:-:-:-:-:-:-:
Entered here:
https://www.onlinecardclasses.com/springcardcamp/wp-content/uploads/sites/47/2020/04/SPRSCC2020-participant.png
Student Gallery, Days 1-5
:-:-:-:-:-:-:-:-:-:-:-:-:-:-:-:-:-:-:
Uniko Studio
Used Materials:
for the embossing panel:
Uniko Stamps: Stamps: Spring Botanicals /
Cardstock - white / Tsukineko: VersaMark Ink / efco: embossing powder - white /
Simon Says Stamp!: Die: Stitched Rectangles (SSSD111455) /

Colours & other stuff:
Cardbase A6 - white / Cardstock - green  /
Stampin'Up: Watercolour paper (122959) /
Kuretake/Zig: Clean Color Real Brush - yellow (050), light green (041) + water /
3D Tape, 2 mm / Kleberoller /
green satin ribbon, 3 mm / 
:-:-:-:-:-:-:-:-:-:-:-:-:-:-:-:-:-:-:
Hugs & greetings from Wiebke
:-:-:-:-:-:-:-:-:-:-:-:-:-:-:-:-:-:-:
Hope these cards inspire you to try this technique too!
Have a good time, stay at home and healthy and be creative!
😀

Samstag, 10. August 2019

K1-1176 - Emboss Resist - Hallo

K1-1176 - Emboss Resist - Hallo - Detail

Nachdem ich bei Cards und More die Challenge #37 gewonnen hab, bin ich heute als GastDesigner für die neue Challenge #39 mit dabei! Jippie!😊
Dafür hab ich drei Karten mit der tollen Farbvorgabe gemacht!
 
After I've won the Challenge#37 on the Cards und More Blog I was invited to participate as GuestDesigner for the new Challenge #39 which starts today! Wohoo! 😊

I crafted three cards with this fabulous colour-combination!

UPDATE 12.08.2019:
😢 Da ist wohl leider etwas ziemlich schief gelaufen und mein(e) Bild(er) konnte(n) nicht in den Cards & More Post eingebaut werden... 😭 😶 Auch bis heute (Montag) noch noch nicht!
Ich hab den obigen Text nur durchgestrichen, für den Fall, dass es doch noch klappt, dann könnte ich diese Meldung hier noch mal rückgängig machen... 😞
 
😢 Something went very strange and it seems like it wasn't possible to enter my picture(s) to the Cards und More Challenge-post... 😭 😶 Not until today (Monday)!
I just crossed the text above out, maybe the problem will be fixed, then I can re-change this messages...
😞
Cards und More #39 AG + Colorboard
Hier die dritte Karte:
K1-1176 - Emboss Resist - Hallo
:-:-:-:-:-:-:-:-:-:-:-:-:-:-:-:-:-:-:-:
Gestartet hab ich mit komplett weißem Cardstock.
Zuerst hab ich die Oxide Inks mit der Smooshing-Technik aufgetragen.
Dann über die Stencil die Embossing Tinte aufgetragen und mit transparentem Pulver embosst.
Anschließend die (gesäuberte!) Stencil gedreht, damit die Dreiecke in die andere Richtung zeigen, und zwischen den embossten Dreiecken plaziert. Erst mit den Blending Tools passend zur vorhandenen Farbe auf dem Papier noch mehr Farbe aufgetragen und (nach dem Reinigen der Stencil!) wieder Embossing Tinte und Pulver. Diesen Schritt hab ich nochmal wiederholt.

Jetzt mit dem schwarzen Stempelkissen das komplette Papier bearbeiten! Seltsamerweise kostet mich das jedesmal, wenn ich es mache Überwindung, warum auch immer?!?
Jetzt noch die überschüssige Farbe mit einem Tuch entfernen. Da es noch eine ganze Weile bei Berührung nachgefärbt hat, hab ich eine hauchdünne Schicht MicroGlaze aufgetragen. Seither kann man es anfassen, ohne Spuren an den Fingern zu sehen.

Der Rest war einfach: Das Sechseck ausstanzen, mit Vellum hinterlegen und den feinen Vellum-Rahmen aufkleben. Das doppelte Hallo ausstanzen, beide Teile einfärben, embossen und zusammengeklebt auf die Karte kleben.
Bei dem hellgrauen Papier, das als Zwischen-Layer eingefügt ist, an der entsprechenden Stelle ebenfalls ein Sechseck ausstanzen (der Einfachheit halber etwas größer als das auf der Front) und es flach auf die Kartenbasis kleben. Dann den Vordergrund mit 3D Tape auf dem grauen Papier befestigt.

I started with white paper.
First I applied the Oxide Inks with the smooshing technique onto my paper.
Then I used the stencil with the embossing ink and added clear powder to emboss it. Then I replaced the (cleaned!) stencil in different direction and added more colour with my blending tools. Cleaned the stencil and added embossing ink again. Heat ambossed two times with clear powder.


The next step is hard, every time I use this technique! I applied the black ink directly with the black ink pad on the whole panel!

After I removed the excess colour with a towel I got still black fingers... so I added a thin layer of MicroGlaze. Now it's perfect!

The rest was easy peasy: diecut the hexagone, put a piece of vellum behind and adhere the fine vellum-frame. Also diecut the sentiment, colour and heat emboss it, layer it and glue it on the hexagone.
I put a layer of light gray paper between my cardbase and the front layer. To get a clear vellum hexanone, I cut a bigger hexagone out of this gray paper, then adhered it flat onto my cardbase. The front is adhered with 3D tape.
:-:-:-:-:-:-:-:-:-:-:-:-:-:-:-:-:-:-:-:
:-:-:-:-:-:-:-:-:-:-:-:-:-:-:-:-:-:-:-:
"This list includes unpaid & uncommissioned advertisement!"
Used Materials:
Create A Smile: Stencil: Triangles & Dies: doppeltes Hallo /
Craft Emotions: Dies: Edges straight Hexagon (115633/0813) /

Colours & other stuff:
folded cardbase A6 - white / Canson: Imagine - Mix Media Cartridge (200g/m²) / Cardstock - hellgrau & Scraps: schwarz, weiß  / Vellum /
Ranger: Emboss-it Dabber & Embossing Powder - clear & Oxide Inks - candied apple, carved pumpkin, mustard seed, mowed lawn, black soot + Aqua + Blending Tools & Distress MicroGlaze & Multi Medium matte /
Kleberoller / 3D Tape - 3 mm /
:-:-:-:-:-:-:-:-:-:-:-:-:-:-:-:-:-:-:-:
Bunte Grüße von Wiebke
Colourful greetings from Wiebke
:-:-:-:-:-:-:-:-:-:-:-:-:-:-:-:-:-:-:-: