Posts mit dem Label Anhänger=Tag werden angezeigt. Alle Posts anzeigen

Dienstag, 11. Juli 2023

K1-1666 - Löwen-Babykarte

Vergangenes Jahr habe ich eine Hochzeitskarte im Löwen-Design gestaltet.
Die Familie hat nun Zuwachs bekommen und ich brauchte eine Baby Karte!
Mir gefiel die Idee, sie in Anlehnung an die erste Karte zu gestalten... Auf der hatte ich vier Löwen gestempelt, doch woher nun den kleinen fünften Löwen nehmen?
Leider gab es bisher nur den Löwen-Papa bei Create A Smile auch als Mini-Stempel, also musste ich mir anders behelfen... Schrumpffolie passte da doch perfekt!
Also gestempelt, mit einer passenden Kreisstanze ausgestanzt und geschrumpft. Musste ja erst mal schauen, wie klein er dann am Ende wirklich wird. Die Größe passte gut!
Und jetzt? Ihn nur so "klein, aber dick" auf die Karte zu kleben gefiel mir nicht!

In einem Create A Smile Baby Set ist ein Storch mit Beutel...
So langsam nahm die Idee mehr und mehr Gestalt an!

:-:-:-:-:-:-:-:-:-:-:-:

Last year I made a wedding card with a lion design.
The family has grown now and I needen a baby card!
I liked the idea to create it in the same style as the wedding card... there I stamped four lions, but where should I find a little fifth lion?
The German stamp company Create A Smile made some mini stamps, but there is just the lion-dad, not a little one. I needed another plan... Shrinking foil! That was my solution!
So I stamped, cut it out in a circle and shrank it. Needed to know the new size of the stamped lion. It was just perfect!
But I wasn't happy with placing it just as "small but thick"  as it was beside the other family members.

Another set of the company includes a stork with a bag...
The idea slowly took shape!

:-:-:-:-:-:-:-:-:-:-:-:-:-:-:-:-:-:-:-:
KomMa-designed_K1-1666_#1
K1-1666 - Babykarte Yasin

Der Beutel des Storchs hat eine Tropfenform. Ich stempelte ich den kleinen Löwen auf die Folie, stanzte ihn aus, verpasste dem Tropfen noch ein kleines Loch und schrumpfte ihn.
Was soll ich sagen?! Er passte ziemlich perfekt!

Nun wollte ich den kleinen Knirps aber nicht so ganz uneingepackt reisen lassen, also stanzte ich einen weiteren Tropfen, nur etwas größer als die Folie (Details hierzu weiter unten).
:-:-:-:-:-:-:-:-:-:-:-:
The bag of the stork is drop shaped. I stamped the little lion again on the foil, added a small hole and shrank again.
What shall I say?! It matched perfectly!

I didn't want the little one travelling without any wrapping. So I diecut another drop, just a little bit bigger than the foil (more details below).

KomMa-designed_K1-1666_#2
K1-1666 - Babykarte Yasin - Geheimnis

Die Idee für das Layout stammt aus der letzten Create A Smile Sketch Challenge. (Leider wurde ich erst zu spät fertig und konnte die Karte dort nicht mehr zeigen!)

Ich habe mit einer Geschenk-Anhänger-Stanze und "partial die-cutting" mein ausgestanztes Teil "verlängert". Dazu erst nur etwa zwei Drittel der Metallform gestanzt, dann Papier und Stanze neu positioniert (auf die Stitching-Line geachtet!) und wieder etwa zwei Drittel und das andere Ende gestanzt.

Der Hintergrund mit Steppe und Nachthimmel ist mit Oxide Inks gestaltet (ähnlich wie bei der Hochzeitskarte). Hier ist aber am Himmel nicht ein großer "König der Löwen"-Papa Mufasa zu sehen, sondern ein Mond und Sterne. 
Für den Sketch habe ich noch Garne zugefügt - Jute symbolisiert Naturverbundenheit und der feine Goldfaden steht für edel und wertvoll. Die Schleife aus dem Sketch ist bei mir etwas "verrutscht" - sie findet sich beim Storchenbeutel.
Das kleine papierene Add-On ist bei mir nicht bogenförmig, sondern mit kleinen Zacken. Ich werde dort noch den Namen des Babys eintragen - Yasin.
:-:-:-:-:-:-:-:-:-:-:-:
The idea for the card layout I took from the last Create A Smile Sketch Challenge. (sadly I fisished the card too late to participate there!)

I used a tag die, but I made partial die-cutting to "extend" the result. First I cut about two-thirds of the metal die, then I moved die and paper (took care for the stitching line!) und diecut again about two-third and the other end.

The background with veld and nightsky is made with Oxide Inks (similar to the wedding card). Here isn't the big "Lion King"-Dad Mufasa visible in the sky area, but moon and stars.
For the sketch I added some twine - jute symbolises affinity with nature and the fine golden thread stands for noble and valuable. The bow of the sketch slipped out a bit - it's placed at the bag of the stork.
The little paper add-on I cut with spikes instead of scallops. I will write the name of the Baby there - Yasin.

KomMa-designed_K1-1666_#3
K1-1666 - Babykarte Yasin - Geheimnis Detail

Die Hülle für den Storchenbeutel ist mit einer Tropfenform gestanzt. Ich habe zuvor ein Papier gefaltet und dann den Falz entlang einer der Geraden von der Spitze zur Rundung hin so gelegt, dass es gerade so nicht(!) gestanzt wird. Dadurch ist der Tropfen wie eine kleine Klappkarte auf einer Seite geschlossen. (Alternativ könnte man hier auch ein Herz schneiden und es anschließend in der Mitte falzen.)
Ich fädelte Papier-Schrumpffolie-Papier auf einen hellblauen Zwirn, der nun mit einer Schleife das kleine Päckchen zusammenhält.
Wer also die Schleife löst, lüftet das kleine verborgene Geheimnis!
:-:-:-:-:-:-:-:-:-:-:-:
The wrapping for the stork bag is diecut with a drop die. First I folded a paper and then placed the fold along the straight edge of the die so it didn't cut. It's like a little shaped folded cardbase. (Without a drop die you can cut a heart and fold it in half.)
I threaded paper-shrinking foil-paper onto a light-blue twine, bound a bow which holds the small package together now.
The one who opens the bow may take a look onto the little hidden secret!

KomMa-designed_K1-1666_#4
K1-1666 - Babykarte Yasin - Inside
KomMa-designed_K1-1666_#5
K1-1666 - Babykarte Yasin - Inside Detail

Die Innenseite habe ich noch mit einem ganz hellen, pastellfarbenen Papier gestaltet. Der Mond von der Vorderseite ist noch mal mit aufgenommen, ein "Glückwunsch zu Eurem Knirps" und ein kleiner gestempelter Makramee-Regenbogen.
:-:-:-:-:-:-:-:-:-:-:-:
The inside I decorated with a very light pastell paper. The moon and star stamp from the front got a second place here, also a little German sentiment like "Congratulation on your little one"  and a little stamped macrame rainbow.
:-:-:-:-:-:-:-:-:-:-:-:-:-:-:-:-:-:-:-:
Entered in these Challenges:

Create A Smile - June Sketch
Ich war leider zu spät erst fertig geworden...
😔
The card was finished too late to participate...
:-:-:-:-:-:-:-:-:-:-:-:-:-:-:-:-:-:-:-:
Used Materials:
Create A Smile: Stamps: Königlich, Mini-Mensch & Dies: Lovely Tags M 
My Favorite Things: Die-Namics: Color Drops Stax / 
Pretty Pink Posh: Dies: Stitched Borders / 

Colours & other stuff:

folded cardbase Din lang - white / Cardstock - white (2 different), light pastell yellow (inside) / 
Tsukineko: VersaFine - onyx black / Ranger: Distress Oxide Inks - chipped sapphire, blueprint sketch, dusty concord, black soot, scattered straw, rusty hinge, tea dye, brushed corduroy, walnut stain, aged mahagany + Blending tool +Waterbrush & Mulit medium matte / Copic: Ciao Marker - C-1, C-0, 0 / Stabilo: Pen68 Marker - greys, reds, black / FaberCastell: Pitt artist pen XS, S - black / Sakura: Gelly Roll: Stardust - #719, 725, 736, 738 & Metallic - #553 / Tonic Studio: Nuvo crystal drops gloss - ebony black /
Aleene's Tacky Glue / Kleberoller / 3D-Tape - 1mm, 2mm /
:-:-:-:-:-:-:-:-:-:-:-:-:-:-:-:-:-:-:-:
Willkommens-Grüße von Wiebke
 Welcome greetings from Wiebke
:-:-:-:-:-:-:-:-:-:-:-:-:-:-:-:-:-:-:-:

Sonntag, 9. Juli 2023

K1-1292 - Baby Melina

Diese Babykarte hab ich schon vor einer Weile gebastelt, aber bisher noch keine Gelegenheit gehabt, sie hier zu zeigen!

Wenn möglich, integriere ich gerne den Namen des Babies in das Karten-Design. 
Entweder nur mit Buchstaben oder, wenn die Bedeutung es ermöglicht, auch mit grafischen Elementen.
So wie in diesem Fall!
Melina kommt aus dem Griechischen und bedeutet "die Honigsüße" (
laut einer Seite für Namens-Bedeutung). Da lag die Verwendung von Bienenstock, Bienen und Honiggelb nahe!

:-:-:-:-:-:-:-:-:-:-:-:

When it's possible, I try to integrate the name of newborns into the design of baby cards.
Either only with letters or when the meaning makes it possible also with graphic elements.
So I did in this card!
Melina is a Greek name and means "honeyed" (told me a page for meaning of names). So the use of beehive, bees and honey yellow was obvious!

:-:-:-:-:-:-:-:-:-:-:-:-:-:-:-:-:-:-:-:
KomMa-designed_K1-1292_#1
K1-1292 - Baby Melina
 
:-:-:-:-:-:-:-:-:-:-:-:-:-:-:-:-:-:-:-:
Used Materials:
Stampin'Up & Sissix: Stamps: Tierische Glückwünsche (144412) & Dies/Framelits: Tierische Grüße (143743) & Cardstock extrastark - Flüsterweiß 
Create A Smile: Dies:
 Lovely Tags XS, Cherry letters /
Lawn Fawn: Dies: Small stitched rectangles stackables & Grassy Border /
Marianne Design: Dies: Wichtel (LR0554) ➝ Schleifen /

Colours & other stuff:
Cardstock - hellgrün, grün, weiß & Kraftpaper / 
Tsukineko: Memento - tuxedo black / 
FaberCastell: Polychromos Colour Pencils / Ranger: Glossy Accents, Multi Medium matte / 
Twine - weiß / 
Kleberoller / 3D-Pads - 1 mm & 2 mm / 
:-:-:-:-:-:-:-:-:-:-:-:-:-:-:-:-:-:-:-:
Bärige Grüße von Wiebke
Beary greetings from Wiebke
:-:-:-:-:-:-:-:-:-:-:-:-:-:-:-:-:-:-:-:

Sonntag, 30. Januar 2022

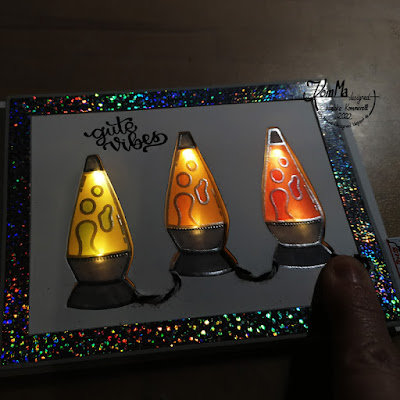
K1-1557 - LED-Lavalampen

Seit ich diesen Lavalampen-Stempel in meinem Adventskalender ausgepackt hab, will ich mit ihm eine LED-Karte machen! Anfang Januar kam ich dann dazu. 😀
Wegen Corona musste der Empfänger bis jetzt warten, eh er sie bekam - und damit auch ihr, da ich sie nicht früher posten wollte! 
Hat zwar (da ich längere Zeit keine LED-Karten gemacht hatte) einen zweiten Anlauf gebraucht, bis die Technik samt Schalter meinen Vorstellungen entsprach, aber jetzt bin ich happy mit dem Ergebnis!

Der Clou: Nachdem man das kleine Tag herausgezogen hat 
(= die Sicherung gegen unbeabsichtigtes Einschalten), muss man auf die Stelle mit dem Stecker drücken. Erst dadurch leuchten dann alle drei Lampen - perfekt für Empfänger, die vor Energie regelrecht sprühen! 😉 

:-:-:-:-:-:-:-:-:-:-:-:

In the moment I got this lava lamp stamp out of my advent calendar I want to ´create a LED card with it! At the beginning of January I could start the project. 😀
Ccause of Corona, the recipient had to wait until now to get it - and also you had to wait, cause I didn't want to post it before he got it! 
I needed a second try to create it (I hadn't made LED cards for a much too long time) until all techniqual stuff and also the switch worked like I planned it, but now I'm happy with the result!

The special clou: After the tag is moved out (= the protection against unwanted switch on) you need to press the place with the plug. Then all three lamps start to shine - perfect for recipients with lots of personal energy!  😉

:-:-:-:-:-:-:-:-:-:-:-:-:-:-:-:-:-:-:-:
KomMa-designed_K1-1557_LED-Lavalampen#1+2
K1-1557 - LED-Lavalampen
KomMa-designed_K1-1557_LED-Lavalampen#4
K1-1557 - LED-Lavalampen
:-:-:-:-:-:-:-:-:-:-:-:-:-:-:-:-:-:-:-:
Used Materials:
Create A Smile: Stamps: Gute Vibes 
Simon Says Stamp: Dies: Bundle of stitched shapes (SSSD 111412) / 


Colours & other stuff:

folded cardbase A6 - white / Stampin'Up: extrastarker Cardstock - Flüsterweiß (140490) / Faltkarten: Cardstock - hellgrau / Vellum / 
Tsukineko: Memento - tuxedo black & VersaMark Ink / Ranger: Embossing Powder - silver & Multi medium matte & Glossy Accents / Stabilo: Pen68 Marker / Sakura: Gelly Roll metallic - silver / 
ImH: Hologramm Tape 7,5 mm - silver & LED Leuchtdioden warmweiß, 3 mm / Copper-Tape / Lötzinn = Solder / Bakers Twine - black+white / 
3D-Tape (2 x 2 mm = 4 mm) / Kleberoller / 

Als Extra-Material brauchte ich noch einen Lötkolben. / As extra supplies I needed a solderiung iron.  
:-:-:-:-:-:-:-:-:-:-:-:-:-:-:-:-:-:-:-:
Leuchtende Grüße von Wiebke
Enlightened greetings from Wiebke
:-:-:-:-:-:-:-:-:-:-:-:-:-:-:-:-:-:-:-:

Donnerstag, 2. September 2021

K1-1494 - verspätete Grüße

Ich hab für die Online Card Class - "Crushing on Cardstock" zum Video von Cathy Zielske am Tag 1 mehrere Karten mit Embossing Foldern gestaltet.
Für die Karte Nummer drei habe ich den selben Embossing Folder nochmal verwendet - mit völlig anderem Ergebnis!

:-:-:-:-:-:-:-:-:-:-:-:

I made several cards with embossing folders for the Online Card Class - Crushing on Cardstock" after I saw the video from Cathy Zielske on Day1.
For this card number three I used the same Embossing Folder as for the second one, but with a totally different result!

The translation of the German sentiment on the front "Ups - zu spät" = "Oups - too late" and on the inside "Alles Gute - nachträglich" = "best wishes - subsequently".
:-:-:-:-:-:-:-:-:-:-:-:-:-:-:-:-:-:-:-:
KomMa-designed_K1-1494_verspäteteGrüße#1
K1-1494 - verspätete Grüße
KomMa-designed_K1-1494_verspäteteGrüße#2
K1-1494 - verspätete Grüße - Detail
KomMa-designed_K1-1494_verspäteteGrüße#3
K1-1494 - verspätete Grüße - Detail clock
KomMa-designed_K1-1494_verspäteteGrüße#4
K1-1494 - verspätete Grüße - Details clock movement & inside
:-:-:-:-:-:-:-:-:-:-:-:-:-:-:-:-:-:-:-:
My card was inspired by the shown
technique of Cathy Zielske
on Day 1 (creative patterns)

The card is uploaded in the gallery of Day 1.
:-:-:-:-:-:-:-:-:-:-:-:-:-:-:-:-:-:-:-:

Used Materials:
Sizzix/TimHoltz Alterations: Embossing Folder: Pocket Watches /
CreateA Smile: Stamps: Voll verpeilt /
QuicKutz: Dies - little Tag /

Colours & other stuff:

folded cardbase A6 - white / Cardstock - white & light gray /
Tsukineko: VersaFine - onyx black / Sakura: Gelly Roll metallic #529, clear star #729 / Tonic Studios: Nuvo Crystal Drops gloss - ebony black / 
Ranger: Multi medium matte / 3D-Tape 2 mm /
Holographic Tape 5 mm - turquoise / Stampin'Up: Bright Candy Dots - süße Pünktchen Signalfarben (130931) + Brad / Rico Design: Brads + Zeiger /
:-:-:-:-:-:-:-:-:-:-:-:-:-:-:-:-:-:-:-: 
Späte Grüße von Wiebke  
Late greetings from Wiebke 
 :-:-:-:-:-:-:-:-:-:-:-:-:-:-:-:-:-:-:-:

Samstag, 7. November 2020

25 Days of Christmas Tags 2020

Wiebke Kommerell - KomMa-designed - T-11
Tag 11 - heartfelt Christmas

Wiebke Kommerell - KomMa-designed - T-10
Tag 10 - metallic cones
:-:-:-:-:-:-:-:-:-:-:-:-:-:-:-:-:-:-:-:
Welcome to Day 7 of the 25 Days of Christmas Tags 2020!
It's November!
Means, it's also time for the annual "25 Days of Christmas Tags" with Tracey McNeely from "In My Creative Opinion"! 

Donnerstag, 8. November 2018

T-02 - 25 Days of Christmas Tags 2018 - BlogHop - Day 8-2

Tag-02 for Day8

Uniko Studio
 
Today the he company of Uniko participates in a great Bloghop!

Tracey McNeely is organizing the 
again and you can see her own tags and every day lots of tags from creative friends and guests and also the Tag-DT!

It's so much fun!

Tracey also offers prices for participating crafters! So jump to her Blog, look - be astonished - get creative - and win! 

See more Tags on Instagram #25daysofchristmastags2018
or also the last year #25daysofchristmastags2017
 
:-:-:-:-:-:-:-:-:-:-:-:-:-:-:-:-:-:-:-:-:-:-:-:-:

That's from my Instagram-Post (sorry I just copy it in here, but Milos naping time comes to an end...)


@traceymcneely is organizing and sharing a BlogHop on her blog and here on Instagram! The #25daysoftags2018 / #25daysofchristmastags / #25daysofchristmastags2018 
  ❤🎄🎅🤶🎄🎁🔖🎁🏷🎁❤ 
EVERY day there are lots of great tags - from Tracey and her DT, but also from guests and sponsors (26 craft companies!).
Tracey offers amazing prices for everyboddy participating in the fun of #handmade #papercraft or just commenting along the hop! So jump in and win! 🎁 (The linkup post with all information was posted on 31th of October! on inmycreativeopinion.blogspot.com/2018/10 ! The linkup will be open until 3rd of December, 12:00 am (EST) )

Today #unikoltd is sponsoring the #BlogHop and our DT made some tags for this great event and for YOU!
My two #christmastags both have a #CAS #cleanandsimple design with only one layer, some stamping and simple coloring and a tiby bit of sparkling accents. They are both crafted in almost no-time and so a perfect add-on for all the gifts you want to share in December...! 🎅🤶🎁🎄 

:-:-:-:-:-:-:-:-:-:-:-:-:-:-:-:-:-:-:-:-:-:-:-:-:

My second Tag for today:
It's also a clean and simple tag with the rustic door wreath and a sentiment from Uniko Stamps.


Tag-02 for Day8


See my other tag here.
The participating Uniko-DT-memers you will see on the Uniko-Blog.
:-:-:-:-:-:-:-:-:-:-:-:-:-:-:-:-:-:-:-:-:-:-:-:-:

Vorweihnachtliche Grüße, Eure Wiebke.
Pre-christmas greetings from Wiebke.

:-:-:-:-:-:-:-:-:-:-:-:-:-:-:-:-:-:-:-:-:-:-:-:-:

T-01 - 25 Days of Christmas Tags 2018 - BlogHop - Day 8-1

Tag-01 for Day8 - Detail
:-:-:-:-:-:-:-:-:-:-:-:-:-:-:-:-:-:-:-:
Uniko Studio
 
Today the he company of Uniko participates in a great Bloghop!

Tracey McNeely is organizing the 
again and you can see her own tags and every day lots of tags from creative friends and guests and also the Tag-DT!

It's so much fun!

Tracey also offers prices for participating crafters! So jump to her Blog, look - be astonished - get creative - and win! 

See more Tags on Instagram #25daysofchristmastags2018
or also the last year #25daysofchristmastags2017
 
:-:-:-:-:-:-:-:-:-:-:-:-:-:-:-:-:-:-:-:
That's from my Instagram-Post (sorry I just copy it in here, but Milos naping time comes to an end...)

@traceymcneely is organizing and sharing a BlogHop on her blog and here on Instagram! The #25daysoftags2018 / #25daysofchristmastags / #25daysofchristmastags2018 
  ❤🎄🎅🤶🎄🎁🔖🎁🏷🎁❤ 
EVERY day there are lots of great tags - from Tracey and her DT, but also from guests and sponsors (26 craft companies!).
Tracey offers amazing prices for everyboddy participating in the fun of #handmade #papercraft or just commenting along the hop! So jump in and win! 🎁 (The linkup post with all information was posted on 31th of October! on inmycreativeopinion.blogspot.com/2018/10 ! The linkup will be open until 3rd of December, 12:00 am (EST) )

Today #unikoltd is sponsoring the #BlogHop and our DT made some tags for this great event and for YOU!
My two #christmastags both have a #CAS #cleanandsimple design with only one layer, some stamping and simple coloring and a tiby bit of sparkling accents. They are both crafted in almost no-time and so a perfect add-on for all the gifts you want to share in December...! 🎅🤶🎁🎄 

:-:-:-:-:-:-:-:-:-:-:-:-:-:-:-:-:-:-:-:
My first Tag for today:
It's a clean and simple tag with a colorful and sparkling chain of lights and a sentiment from Uniko Stamps.


Tag-01 for Day8 - Fairy lights

Tag-01 for Day8 - Fairy lights

:-:-:-:-:-:-:-:-:-:-:-:-:-:-:-:-:-:-:-:
Vorweihnachtliche Grüße, Eure Wiebke.
Pre-christmas greetings from Wiebke.
:-:-:-:-:-:-:-:-:-:-:-:-:-:-:-:-:-:-:-:

Freitag, 12. Oktober 2018

A-14 - Baby-Karte *Lea Tira

Arbeiten mit Schablonen und Pasten mag ich ja sehr gerne! Inwischen werkel ich auch immer häufiger mal mit Schablonen und Farben!

Wenn es in der Firma, in der mein Mann arbeitet, etwas zu feiern gibt, werd ich oft gefragt, ob ich dafür eine große DinA5 Karten basteln kann, damit auch alle Kollegen Platz zum Unterschreiben haben...
Jetzt gab es gleich zweimal Nachwuchs (keine Geschwister)! :-)
Die Bären-Karte bekommt "Lea Tira" und "Toni" diese Otter-Karte.
:-:-:-:-:-:-:-:-:-:-:-:
Crafting with stencild and pastes is a big love of me! Meanwhile I started also to use stencils and just colors together!

When there is something to celebrate in the company where my husband is working, they often ask me if I could make a big card in DinA5 (21x14,8 cm) with enough space for all colleagues to sign...
Recently there were two babies born (no siblings)! :-)
The bear-card is for a girl named "Lea Tira" and a boy named "Toni" will receive this otter-card.
:-:-:-:-:-:-:-:-:-:-:-:-:-:-:-:-:-:-:-:
A-14 - Baby Lea Tira
A-14 - Baby Lea Tira - Detail bear
A-14 - Baby Lea Tira
A-14 - Baby Lea Tira - Inside - hidden twine ends
:-:-:-:-:-:-:-:-:-:-:-:-:-:-:-:-:-:-:-:
Über die Karte:
Regenbögen sind super! Sie sind bunt und fröhlich und daher bestens geeignet für Kinder jeden Alters!
Für die kleine Lea Tira hab ich zum einen einen Regenbogen mit Stencil, Oxide Inks und Blending Tool gestaltet und dazu noch einen zweiten aus gestanzten Mini-Tags. Bei den Tags hab ich eine Art Farbverlauf simuliert, indem ich jeweils zwei Tags zusammen an der Schnur befestigt hab und das Herz in der Mitte bereits aus dem nächsten Tag-Duo kam.
Der Bär ist mit verschiedenen Brauntönen koloriert.
Um noch ein gewisses Extra auf die Karte zu bringen, ohne damit aber "optische Unruhe" zu erzeugen, hab ich dem Bären noch einige Luftballons in die Tatze gegeben - sie glitzern ganz dezent in weiß.

:-:-:-:-:-:-:-:-:-:-:-:
About this card:
Rainbows are great! They are colorful and happy and they are perfect for kids of every age!
For little Leo Tira I've created two rainbows - one with stencil, oxide inks and blending tool and a second one made of little die cut tags. I simulated a color blending there by adding two different tags together to the twine and inlayed the colored heart of the next tag-duo in there.

The bear is simply colored in different shades of brown.
To put something special on the card without creating too much "optical disturbance" I gace some sparkling white balloons in the paw of the bear.
:-:-:-:-:-:-:-:-:-:-:-:-:-:-:-:-:-:-:-:
Entered in these Challenges:

Create A Smile Friends & Family  FB-Group - Challenge #10 - Stencils
→ Stencil: Create A Smile - focal point
:-:-:-:-:-:-:-:-:-:-:-:-:-:-:
Sugar Pea Designs - Mix It Up Challenge #48
→ rainbow colors and also the double ring behind the bear as part of the sketch 
(but the sketch isn't perfectly realized I know)
:-:-:-:-:-:-:-:-:-:-:-:-:-:-:
Make My Monday Challenge Blog
Make My Monday Challenge #81 - Animals
→ The bear!
:-:-:-:-:-:-:-:-:-:-:-:-:-:-:-:-:-:-:-:
Verwendete Materialien:
Create A Smile: Stencil - Focal point & Cool Cut Die -Lovely Tags M /
Technique Tuesday: Beary Sweet /
My Favorite Things: Die-namics - Stitch'l DotCircle STX /
Nellie Snellen: MultiFrames - straight round /
Artemio Punch / Picture Punch: Balloons in  small & middle /

Farben & Sonstiges:
Ranger: Distress Oxide Inks - candies apple, carved pumpkin, mustard seed, twisted citron, mowed lawn, salty ocean, dusty concord, wilted violet, seedless preserves & BleningTool & Enamel Accents - black & Multi Medium matte /
Copic: Ciao Marker - E21, E31, E33, E37, E47, E49, E29, 0 /
Stampin'Up: extrastarker Farbkarton - Fl.weiß (140490) & Glitzerpapier - Sternenschimmer (146957), Diamantengleißen (135315) /
Cardstock-Scraps / 3D Tape, 1 mm, 2 mm /
:-:-:-:-:-:-:-:-:-:-:-:-:-:-:-:-:-:-:-:
Bärige Grüße, Eure Wiebke.
Bear-hug greetings from Wiebke.
:-:-:-:-:-:-:-:-:-:-:-:-:-:-:-:-:-:-:-:

Montag, 29. Januar 2018

K1-887 - für dich - Gift Card

Ich mag meine Idee der Karten mit eingebautem Geschenkkarten-Halter im Inneren immer noch. Daher hab ich gleich noch eine gemacht!
Wenn ihr mehr davon sehen wollt: Klamotten-Shoppen & Multimedia Geschenkkarten.
Diesmal ist sie neutraler gehalten und daher für jede Art von ShoppingCard gut geeignet.

I still like my idea of cards with a pocket tag for gift cards on the inside. So I made another one!
If you want to see more: Clothes-Shopping & Multimedia gift cards.
This time it's a more neutral design so you can use it for any kind of shopping card.


Translation of the German sentiments "für dich" = "for you" & "Alles Gute" = "All the best" or "Best wishes".
:-:-:-:-:-:-:-:-:-:-:-:-:-:-:-:-:-:-:-:
K1-887 - für dich - Gift Card

K1-887 - für dich - Gift Card - Detail

K1-887 - für dich - Inside

K1-887 - für dich - Inside with gift card
:-:-:-:-:-:-:-:-:-:-:-:-:-:-:-:-:-:-:-:
Über die Karte:
Ich hab hier mit einer Emboss-Resist-Technik gearbeitet. Erst den Text und die Sterne in zwei Schritten (da zwei unterschiedliche Embossing-Pulver Farben) heat embosst und anschließend mit dem Blending Tool die Distress-Oxide Inks aufgetragen.
Man könnte auch erst blenden und dann embossen, aber bei hellen Embossing-Farben kann da dann der dunklere Hintergrund durchscheinen und die Farben wären nicht mehr so schön sauber und satt!

About this card:
Here I worked with an emboss resist technique. First I heat embossed the sentiment and the stars in two steps (cause I used two different colors of smbossing powder) and then I blended the background with Distress Oxide Inks.
You can also first blend and then emboss, but when you use light embossing powder colours a darker background might peek through and then the colours wouldn't lock as clean and saturated as now!
:-:-:-:-:-:-:-:-:-:-:-:-:-:-:-:-:-:-:-:
Entered in these Challenges:
Create A Smile Blog Challenge #1 - tag it
→ the TAG is on the inside of the card
all used stamps and dies are from "Create A Smile"
  :-:-:-:-:-:-:-:-:-:-:-:-:-:-:
CASology #284 - Late
 → LATE Night starry sky.
:-:-:-:-:-:-:-:-:-:-:-:-:-:-:-:-:-:-:-:
Verwendete Materialien:
Here I mention some of the products I used on this card:
Create A Smile: Stamps: Friede Freude Lebkuchen, Dekorierte Grüße, Dekorierte Grüße - bunte Erweiterung,  Ausflippen (→ little Star) & Cool Cuts Dies: Pocket Tag /

Colours & Inks:
Tsukineko: VersaMark Ink & Memento Tuxedo Black / Reprint: Embossing Powder - silver pearl / Stempelburg: Embossing Powder - antique gold / Ranger: Distress Oxide Inks - faded jeans, salty ocean, black soot + Blending Tool, fossilized amber / 
:-:-:-:-:-:-:-:-:-:-:-:-:-:-:-:-:-:-:-:
Sternen-Grüße, Eure Wiebke.
 Starry greetings from Wiebke.
:-:-:-:-:-:-:-:-:-:-:-:-:-:-:-:-:-:-:-:

Sonntag, 28. Januar 2018

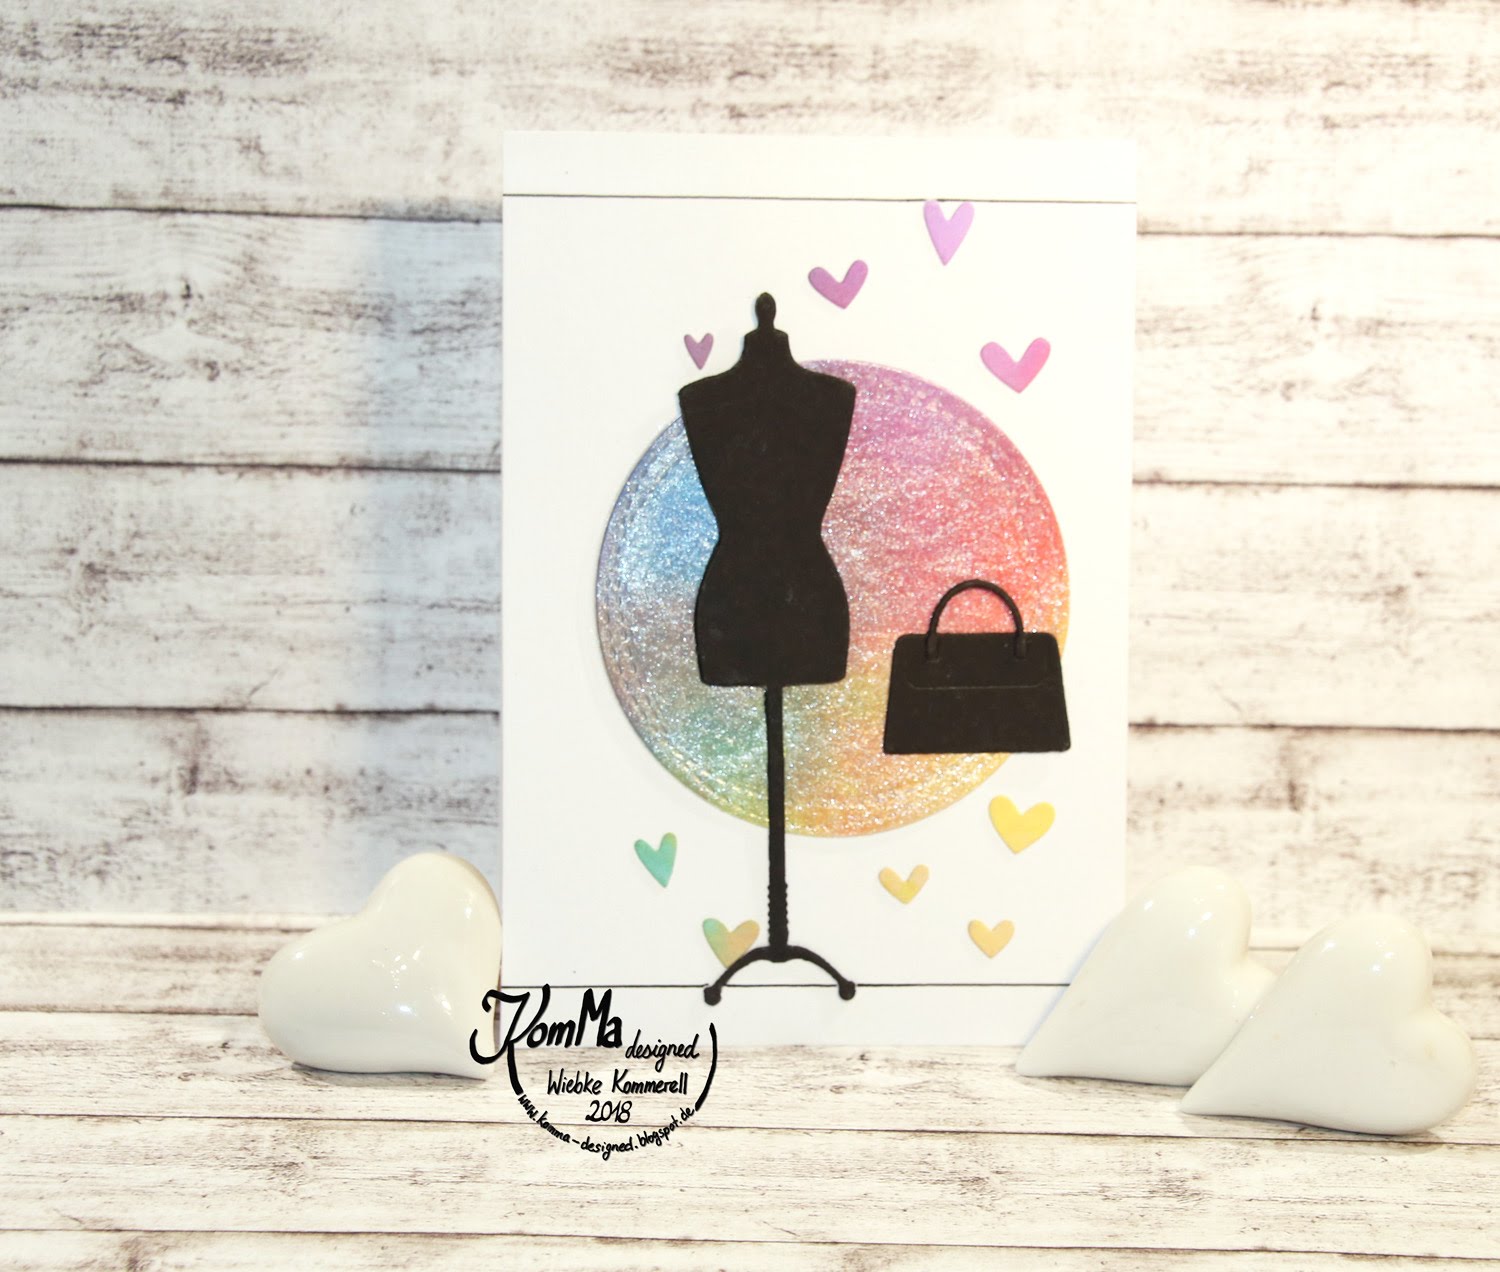
K1-884 - Shopping - Gift Card

Und nochmal eine Karte mit einem gewischten Distress Oxide Ink Hintergrund.
Diesmal hab ich eine Karte für eine Einkaufs-Geschenkkarte, die dann innen platziert wird, gestaltet.

Once more a Distress Oxide Ink blended Background.
This time I made a card for a shopping-gift card on the inside.


Um das Gefühl für's "Shoppen gehen" darzustellen, hab ich einen farbenprächtigen Spiegel gestaltet und dann einfach eine Schneiderpuppe und eine Handtasche davor platziert. Der Spaß am und die Liebe für's Shoppen wird durch die vielen kleinen Herzen symbolisiert.

To get the feeling of shopping I created a colourful mirror with the simple shapes of a dressmaker's dummy and a handbag in front of it. The fun of and love for shopping is symbolized by the little hearts.
:-:-:-:-:-:-:-:-:-:-:-:-:-:-:-:-:-:-:-:
K1-884 - Shopping Gift Card

K1-884 - Shopping Gift Card

K1-884 - Shopping Gift Card

K1-884 - Shopping Gift Card
:-:-:-:-:-:-:-:-:-:-:-:-:-:-:-:-:-:-:-:
Über die Karte:
Diesmal hab ich Aquarellpapier und Regenbogenfarben verwendet. Im mittleren Bereich war ich beim Auftragen und Mischen der Farben sehr vorsichtig, um ein schmuddeliges Braun zu vermeiden.
Ich hab dann den Kreis mit der StitchingLine und die Herzen ausgestanzt. Der Kreis ist mit einer irisierenden Schicht überzogen (ähnlich wie Wink of Stella, ich verwende es auf größeren Flächen, da es dann ergiebiger ist) und dann mit einer Fensterfolie abgedeckt, die mit derselben Stanze ausgeschnitten wurde.
Noch etwas mehr Stanzarbeit für die Schneiderpuppe, die Handtasche und den Geschenkkartenhalter auf der Innenseite der Karte und dann musste nur noch alles zusammengesetzt werden. Die Schneiderpuppe verdeckt den Bereich, in dem das Acetat auf gegeklebt wurde.
Damit die Utensilien ein "Zuhause" haben (also nicht optisch nur "herumfliegen") hab ich mit zwei Simplen Linien eine Wand erzeugt, an der der Spiegel hängt. Um den Ombre-Effekt optisch korrekt auf der Karte wiederzugeben, hab ich mein Aquarellpapier beim Aufkleben der Herzen als Schablone verwendet.
Zum Schluß wurde noch die Geschenkkarten-Hülle im Inneren der Karte platziert.

About this card:
This time I used watercolor paper and rainbow colours. In the middle area of the paper, where the colours meet each other I blended very carefully to avoid a brown mess.
I cut out a stitched circle and some hearts with dies. The circle is covered with an iridescent medium (it's a bit like Wink of Stella, I use it on bigger areas cause it's abundant) and a layer of acetat I cut out with the same die.

Some more diecutting for the shopping stuff and the pocket tag for the inside of the card and then just putting everything together. The dummy covers the area where I glued the acetat on the paper.
I framed the cardbase with two simple black lines to give everything a "home" (so they don't "fly" around) - the mirror is hanging on a wall now. To get the right feeling of the ombree-effect of the colours I used my coloured paper as a guide to place the little hearts.
The pocket tag is fixed on the inside.
:-:-:-:-:-:-:-:-:-:-:-:-:-:-:-:-:-:-:-:
Verwendete Materialien:
Here I mention some of the products I used on this card:
My Favorite Things: DieNamics - Wonky Stitched Circles Stax / 
Memory Box: Tall dress Form, Chic Bag / 
Simon Says Stamp: Mini Hearts Set / 
Create A Smile: CoolCuts - Pocket Tag /

Colour, Inks & Glues:
Ranger: Distress Oxide Inks + Blending Tool & Multi Medium matte / Faber Castell: PITT artist pen SB, S - black / Winsor & Newton: Watercolour  - iridescent medium /
:-:-:-:-:-:-:-:-:-:-:-:-:-:-:-:-:-:-:-:
 Einkaufsbummel-Grüße, Eure Wiebke.
Shopping expedition greetings from Wiebke.
:-:-:-:-:-:-:-:-:-:-:-:-:-:-:-:-:-:-:-:

Sonntag, 2. Juli 2017

A-013 - Baby-Karte *Selma Helene

Ich wurde gefragt, ob ich eine Willkommens-Karte für eine kleine Dame basteln könnte... Hier ist sie - in extra-groß!

I was asked to create a welcome-card for a little lady... Here it is - in extra-large!
:-:-:-:-:-:-:-:-:-:-:-:-:-:-:-:-:-:-:-:
A-013 - Baby-Karte * Selma

A-013 - Baby-Karte * Selma
:-:-:-:-:-:-:-:-:-:-:-:-:-:-:-:-:-:-:-:
:-:-:-:-:-:-:-:-:-:-:-:-:-:-:-:-:-:-:-:
Verwendete Materialien:
I just mention some of the special products I used on this card:

Create A Smile: CoolCuts - Lovely Tags XS / Memory Box: Alphabet Soup & Uppercase Alphabet Soup / Lawn Fawn: small stitched Rectangle Stackables ( partial die-cut enlarged rectangle) / Reverse Confetti Stamps: Bear Hugs / Copic: Ciao Markers / Stabilo: Markers Pen68 / Ranger: Stickles X-mas red /
:-:-:-:-:-:-:-:-:-:-:-:-:-:-:-:-:-:-:-:
Koala-Grüße, Eure Wiebke.
Koala-greetings from Wiebke.

:-:-:-:-:-:-:-:-:-:-:-:-:-:-:-:-:-:-:-: