Mittwoch, 29. April 2020

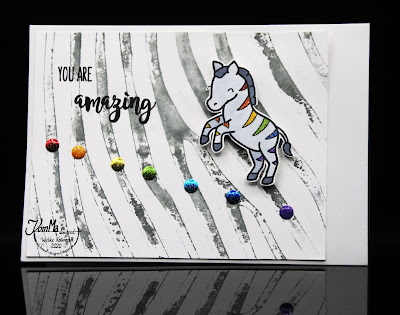
K1-1353 - You are amazing

Here is the second card of my OCC "Spring Card Camp" Day 9 - crafting session with stencils. Channin Pelletier showed this cool technique.
Maybe the colourful "Rainbow" cards of Dawn Woleslagle of Day 11 slopped in here a bit too... ;-)

If you havn't seen the first card, please hop here to see the first-generation use of the stencil.
  :-:-:-:-:-:-:-:-:-:-:-:-:-:-:-:-:-:-:-:
K1-1353 - You are amazing
:-:-:-:-:-:-:-:-:-:-:-:-:-:-:-:-:-:-:-:
The inked stencil of the first card I covered with a thin mist of water to reactivate the ink and then I pressed it down onto another white paper.
This second-generation stencil print looks totally different to the first one! - It's not only the inverse pattern but also the colours aren't as intense. They look softer and more like a watercolour effect!

I used some uplifting rainbow-colours fot the zebra and also for the metal dots. I think "You are amazing" is a perfect sentiment for this little scene.
In my stash I havn't metal dots in all rainbow colours, so I used two white ones and coloured them with Copic Markers in orange and violet.
:-:-:-:-:-:-:-:-:-:-:-:-:-:-:-:-:-:-:-:
Entered here:
https://www.onlinecardclasses.com/springcardcamp/wp-content/uploads/sites/47/2020/04/SPRSCC2020-participant.png
Online Card Class "Spring Card Camp"
Student-Gallery Days 6-10
Most of the time I'm inspired by the videos of the current "OCC - Spring Card Camp" right now.

This is an extra long class - started Saturday, April 11th and last until Thursday, April 30th, Wrap-Up day is Thursday, May 7th. / On every one of the 20 days you get one video with intructions and tips to create in minimum two (different) cards in almost one main working process!
:-:-:-:-:-:-:-:-:-:-:-:-:-:-:-:-:-:-:-:
Used Materials:
Uniko: Stencil: Zebra Print & Stamp: You are, yes you are /
Lawn Fawn: Critters on the savanna /

Colours & other stuff:
Cardbase A6 - white / Neenah: Cardstock solar white #80 & #110 /
Tsukineko: VersaFine - onyx black / Ranger: Distress Oxide Ink -black soot + H2O /
Stabilo: Marker Point88 - Regenbogen-Farben / Copic Ciao Marker - C-1, C-2, C-3, C-5 & YR16, V17 (für Nieten) / Sakura: Gelly Roll - clear star /
Kleberoller / 3D Pads, 2 mm /
ImH: Hot-Fix Glitzer Nieten, 6 mm /

:-:-:-:-:-:-:-:-:-:-:-:-:-:-:-:-:-:-:-:
Hugs & greetings from Wiebke

:-:-:-:-:-:-:-:-:-:-:-:-:-:-:-:-:-:-:-:
Have a good time, stay at home and healthy and be creative! 😀

K1-1352 - Wild about you

The technique I used to create this card was shown by Channin Pelletier on Day 9 of the OCC "Spring Card Camp" and it's called "Inking Stencils".
Like on the other days, the technique ended up in two cards - the secon one you'll find here.

I used the same stencil and the same critter stamp for both cards - but they look so different! - This technique really allows you to strech your materials! :-)
  :-:-:-:-:-:-:-:-:-:-:-:-:-:-:-:-:-:-:-:
K1-1352 - Wild about you
:-:-:-:-:-:-:-:-:-:-:-:-:-:-:-:-:-:-:-:
For the first card I inked through my stencil with Distress Oxide Inks onto smooth white cardstock - nothing fancy so far.
I cut my papers, stamped my image and sentiment and combined everything to the card you see above.

The trick 
Channin Pelletier showed in her video is, to use the stencil again... see, what I've done in the second post
:-:-:-:-:-:-:-:-:-:-:-:-:-:-:-:-:-:-:-:
Entered here:
https://www.onlinecardclasses.com/springcardcamp/wp-content/uploads/sites/47/2020/04/SPRSCC2020-participant.png
Online Card Class "Spring Card Camp"
Student-Gallery Days 6-10
Most of the time I'm inspired by the videos of the current "OCC - Spring Card Camp" right now - this time by Channin Pelletier on Day 9.

This is an extra long class - started Saturday, April 11th and last until Thursday, April 30th, Wrap-Up day is Thursday, May 7th. / On every one of the 20 days you get one video with intructions and tips to create in minimum two (different) cards in almost one main working process!
:-:-:-:-:-:-:-:-:-:-:-:-:-:-:-:-:-:-:-:
Used Materials:
Uniko: Stencil: Zebra Print & Stamp: Wild /
Lawn Fawn: Critters on the savanna /

Colours & other stuff:
Cardbase A6 - white / Neenah: Cardstock solar white #80 & #110 /
Tsukineko: VersaFine - onyx black / Ranger: Distress Oxide Ink -black soot & Glossy Accents / Stabilo: Marker Pen68 & Point88 - black / American Crafts: Zing! Embossing Powder - rouge / Faber Castell: Pitt artist pen, SB - black /
Kleberoller / 3D Pads, 2 mm /
dm: Washi-Tape 7mm & 15 mm - black / K& Company: Mini Heart Pillow Sticker /

:-:-:-:-:-:-:-:-:-:-:-:-:-:-:-:-:-:-:-:
Hugs & greetings from Wiebke

:-:-:-:-:-:-:-:-:-:-:-:-:-:-:-:-:-:-:-:
Have a good time, stay at home and healthy and be creative! 😀

Samstag, 25. April 2020

K1-1350 - Focal Fox

I'm still crafting in every free time I find (I wish I would have more of it!). Most of the time
I'm inspired by the videos of the current "OCC - Spring Card Camp".
:-:-:-:-:-:-:-:-:-:-:-:
For the card I show you in this post, I used the left-over pieces (Fox and Sentiment) from this card.
K1-1349 - Happy Days inside

But my focus was not on the technique of Julie Ebersole showed on Day 4 (Tuesday, 04-14) but on the one of Laurie Willison. She showed it some days later (Day 7, Friday, 04-17) but as I mentioned before, I'm very behind with my daily crafting time cause of the situation at home. So the combination of both techniques was perfect to catch up a bit...!

K1-1349 & K1-1350
Lots of Happy Days!
:-:-:-:-:-:-:-:-:-:-:-:-:-:-:-:-:-:-:-:
K1-1350 - Focal Fox
K1-1350 - Focal Fox - Detail
:-:-:-:-:-:-:-:-:-:-:-:
In the Detail picture you can see, I hadn't pulled out the rays of the Kraft-paper completely. To get a bit of dimension, I lifted the rays of the dicut by adding the cut outs of the same die of a bright yellow paper, folded them in half, glued them together and added them to the openings. So the center part of the kraft-paper rays stay flat and only the outer areas are lifted. 
Was a bit time consuming, but I love the result!
:-:-:-:-:-:-:-:-:-:-:-:-:-:-:-:-:-:-:-:
Entered here:
https://www.onlinecardclasses.com/springcardcamp/wp-content/uploads/sites/47/2020/04/SPRSCC2020-participant.png
OCC Gallery Day 1-5
OCC Gallery Day 6-10

This is an extra long class - started Saturday, April 11th and last until Thursday, April 30th, Wrap-Up day is Thursday, May 7th. / On every one of the 20 days you get one video with intructions and tips to create in minimum two (different) cards in almost one main working process!
:-:-:-:-:-:-:-:-:-:-:-:-:-:-:-:-:-:-:-:
Used Materials:
Mama Elephant: Stamps & Dies: Up and away /
docrafts: XCut: Mini Sentiments "Happy Days" /
Create A Smile: Die: Focal /

Colours & other stuff:
Cardbase A6 - white / Cardstock - black, bright yellow /
Tsukineko: VersaFine - onyx black / Stabilo: Marker Pen68 / Ranger: Enamel Accents - black /
Aleene's Tacky Glue / 3D Pads, 2 mm /

:-:-:-:-:-:-:-:-:-:-:-:-:-:-:-:-:-:-:-:
Hugs & greetings from Wiebke
:-:-:-:-:-:-:-:-:-:-:-:-:-:-:-:-:-:-:-:

Have a good time, stay at home and healthy and be creative! 😀

Donnerstag, 23. April 2020

K1-1351 - Noodle-Cats

The second cards I wanna show you today is also based on the technique, Julie Ebersole showed on Day 4 (Tuesday, 04-14). This technique includes coordinating DieCuts, Insider-Card-Layouts and lots of fun!
This time it's kind of a story-telling card. :-)

:-:-:-:-:-:-:-:-:-:-:-:-:-:-:-:-:-:-:
K1-1351 - Noodle-Cats - Front

K1-1351 - Noodle-Cats - Inside
:-:-:-:-:-:-:-:-:-:-:-:-:-:-:-:-:-:-:-:
Entered here:
https://www.onlinecardclasses.com/springcardcamp/wp-content/uploads/sites/47/2020/04/SPRSCC2020-participant.png
OCC Gallery Day 1-5


This is an extra long class - started Saturday, April 11th and last until Thursday, April 30th, Wrap-Up day is Thursday, May 7th. / On every one of the 20 days you get one video with intructions and tips to create in minimum two (different) cards in almost one main working process.

:-:-:-:-:-:-:-:-:-:-:-:-:-:-:-:-:-:-:
Used Materials:
Mama Elephant: Stamps & Dies: Purrfect Pair /
We R Memory Keepers: Corner Chomper, 1/2" /

Colours & other stuff:
Cardbase A6 - white / Cardstock - black  /
Tsukineko: VersaFine Ink - onyx black / Faber Castell: Polychromos & Albrecht Dürer Aquarellfarben & Pitt artist pen S - black / Ranger: Glossy Accents /

:-:-:-:-:-:-:-:-:-:-:-:-:-:-:-:-:-:-:
Hugs & greetings from Wiebke
:-:-:-:-:-:-:-:-:-:-:-:-:-:-:-:-:-:-:
Have a good time, stay at home and healthy and be creative! 😀

K1-1349 - Happy Days inside

Ok... I have the same "problem" as often while I'm paticipating in Online Card Classes. I can't find enough time to craft AND to blog! This time it's a bit harder as usual, cause here the kids are still completely all at home 😷.
The home-schooling started last monday again and so I have my job as a part-time teacher back... 😬

The cards I wanna show you today are based on the technique, Julie Ebersole showed on Day 4 (Tuesday, 04-14). This technique includes coordinating DieCuts, Insider-Card-Layouts and lots of fun! :-)


:-:-:-:-:-:-:-:-:-:-:-:-:-:-:-:-:-:-:-:
K1-1349 - Happy Days inside - Front
K1-1349 - Happy Days inside - Inside
K1-1349 - Happy Days inside - Detail
:-:-:-:-:-:-:-:-:-:-:-:-:-:-:-:-:-:-:-:
I used the left-over pieces (Fox and Sentiment) from this card for another one.
K1-1350 - Focal Fox
But my focus there was not on the technique of Julie Ebersole but on the one of Laurie Willison. She showed it some days later (Day 7, Friday, 04-17).
But as I mentioned before, I'm very behind with my daily crafting time cause of the situation at home. So the combination of both techniques was perfect to catch up a bit...!
That's why I show the card it in both Galleries.
K1-1349 & K1-1350
Lots of Happy Days!
:-:-:-:-:-:-:-:-:-:-:-:-:-:-:-:-:-:-:-:
Entered here:


https://www.onlinecardclasses.com/springcardcamp/wp-content/uploads/sites/47/2020/04/SPRSCC2020-participant.png
Student Gallery, Days 1-5
Student Gallery Days 6-10

This is an extra long class - started Saturday, April 11th and last until Thursday, April 30th, Wrap-Up day is Thursday, May 7th. / On every one of the 20 days you get one video with intructions and tips to create in minimum two (different) cards in almost one main working process!
:-:-:-:-:-:-:-:-:-:-:-:-:-:-:-:-:-:-:-:
Used Materials:
Mama Elephant: Stamps & Dies: Up and away /
docrafts: XCut: Mini Sentiments "Happy Days" /
We R Memory Keepers: Corner Chomper, 1/2" /

Colours & other stuff:
Cardbase A6 - white / Cardstock - black  /
Tsukineko: VersaFine - onyx black / Faber Castell: Polychromos & Pitt artist pen S - black / Ranger: Multi Medium matte, Glossy Accents / Kuretake/Zig: Wink of Stella - gl. black /

:-:-:-:-:-:-:-:-:-:-:-:-:-:-:-:-:-:-:-:
Hugs & greetings from Wiebke
:-:-:-:-:-:-:-:-:-:-:-:-:-:-:-:-:-:-:-:
Have a good time, stay at home and healthy and be creative! 😀

Sonntag, 19. April 2020

K1-1348 - embossed daffodil -II- / Uniko Brand Ambassador Post

Like I mentioned in first post of today, I was inspired from
Jennifer McGuire who showed this technique on the first day of the current Online Card Class "Spring Card Camp".
K1-1348 - embossed daffodil

https://www.onlinecardclasses.com/springcardcamp/wp-content/uploads/sites/47/2020/04/SPRSCC2020-participant.png
This is an extra long class - started Saturday, April 11th and last until Thursday, April 30th, Wrap-Up day is Thursday, May 7th. 
On every one of the 20 days you get one video with intructions and tips to create two (different) cards in almost one working process.


Two embossed daffodils

Some more information about the technique you can find in post of my first card or in the post on the Uniko Blog.

Uniko Studio

:-:-:-:-:-:-:-:-:-:-:-:-:-:-:-:-:-:-:
The second card is made with an invers impression of the embossing panel.
I softly added some Distress Oxide inks with a blending tool. The colours outside of the expressed lines makes such a soft colour effect!

This card is very simple and a bit plain right now. When I know who will get it, I think I will add a banner or rectangle layer with the sentiment in the bottom third of the flower layer.

Probably with the Simply Said Blocks from Uniko in the colours of one of the two Oxide Ink colours I used for the flower.

K1-1348 - embossed daffodil - Detail
:-:-:-:-:-:-:-:-:-:-:-:-:-:-:-:-:-:-:
Here you can jump to the first card I showed today.
K1-1347 - embossed daffodil - Detail
:-:-:-:-:-:-:-:-:-:-:-:-:-:-:-:-:-:-:
When you use an embossing powder what doesn't "want" to layer thick enough - don't give up! Use this first try, colour it as usual and make a card out of it.
And then make a second try of the layering with another embossing powder (and maybe another brand of paper).

My first one was clear powder from Ranger - and it stayed flat. Why? I still don't know!
The second try was with a white powder from efco (one of my oldest powders in the box) on a different paper. And this turned out great!
I will use it some more times to get impressions and then I will use it as "normal" embossed image on a card - so nothing is wasted! :-)
:-:-:-:-:-:-:-:-:-:-:-:-:-:-:-:-:-:-:
Used Materials:
for the embossing panel:
Uniko Stamps: Stamps: Spring Botanicals /
Cardstock - white / Tsukineko: VersaMark Ink / efco: embossing powder - white /

Colours & other stuff:
Cardbase A6 - white / Watercolour paper (122959) /
Ranger: Distress Oxide Inks - fossilized amber, mowed lawn /
Kleberoller /
:-:-:-:-:-:-:-:-:-:-:-:-:-:-:-:-:-:-:
Hugs & greetings from Wiebke
:-:-:-:-:-:-:-:-:-:-:-:-:-:-:-:-:-:-:
  Hope these cards inspire you to try this technique too!
Have a good time, stay at home and healthy and be creative! 
😀

K1-1347 - embossed daffodil -I- / Uniko Brand Ambassador Post

Was very silent here on my blog for so many weeks - sorry!
But the Pandemic with all the stuff happening during the last weeks kept me away from my crafting table...

Home schooling, new organisation of our everyday life (with 6 person in the house almost 24/7 - that costs lots of nervs sometimes!), long phone calls with family and friends, start of the garden season with all the work outside (planting and seeding), all the time you need to stay half-way informed about all the things happen ouside of the "little safe world" of our house...

And yes, my creativity was gone for a while with all the bad stuff in the newspapers every day from all around the world...

Hope my creative mind is back now!
And I hope I'll find some time to craft - primary schools will be closed for minimum two more weeks here in Brandenburg and kindergarden probably until August (poor Milo, he is missing the time there so badly!)

:-:-:-:-:-:-:-:-:-:-:-:-:-:-:-:-:-:-:
Easter time is over, but in my garden the daffodils (the translated German name "Osterglocke" is "Easter bells") just started to bloom. So I decided to show you some cards with these beautiful spring flowers from Uniko today!

K1-1347 - embossed daffodil
:-:-:-:-:-:-:-:-:-:-:-:-:-:-:-:-:-:-:
two embossed daffodil cards
:-:-:-:-:-:-:-:-:-:-:-:-:-:-:-:-:-:-:
The technique I used was a first try for me.
Jennifer McGuire showed it on the first day of the current Online Card Class "Spring Card Camp".

https://www.onlinecardclasses.com/springcardcamp/wp-content/uploads/sites/47/2020/04/SPRSCC2020-participant.png
This is an extra long class - started Saturday, April 11th and last until Thursday, April 30th, Wrap-Up day is Thursday, May 7th. 
On every one of the 20 days you get one video with intructions and tips to create two (different) cards in almost one working process.
:-:-:-:-:-:-:-:-:-:-:-:-:-:-:-:-:-:-:
The technique I used may be a bit tricky in the first try, but when you managed it successfully, it's easy to repeate and re-use the panel(s) you created many times!

You make your own embossing panel by layering a heat embossed image 10(!) times - layer over layer. The use of a stamping tool helps to get the best possible same-spot stamping.
This thick heat-embossed image allows you, to use it like an embossing folder.

For best results I had to experiment a little bit with my cutting machine and the layers I needed for the embossing. 
At the beginning I was a bit too careful, cause I was afraid to break this heat-embossed image with too much pressure (but everything went well - it looks still the same, ready to use it again).

For my Cuttlebug I used 1x A-plate + 2x B-plates + 1x silicone embossing-matte + the created Embossing Panel + Paper/Cardstock to emboss in + additional Cardstock-Layers
The additional Cardstock-layers depended to the thickness of the watercolour paper I used. 

Watercolour paper has some positive properties to use it with this technique. 
The first one is, you can moisturise it without any risk before you start to emboss - the impression of your embossing panels (or folders) will be better on dampish paper than on dry paper!
The quality of watercolour paper is often softer and thicker than most other papers - also a benefit fort the embossing.
And last but not least you can use watercolours after you have embossed it!
:-:-:-:-:-:-:-:-:-:-:-:-:-:-:-:-:-:-:
The first card I made with an impressed embossed flower.
I coloured the impressed lines of the flower with Zig Real brushes and added some water for a good colour gradient to the areas beside.

A still missing (small) sentiment will be placed right between the green ribbons on the right side of the flower or (when I'll use a bigger one) on the inside of the card.
I hope I can use it as a birthday card and don't need many get well cards soon. (Nobody should be in the situation to need one during the next weeks! So please stay save!)

K1-1347 - embossed daffodil - Detail
:-:-:-:-:-:-:-:-:-:-:-:-:-:-:-:-:-:-:-:
For my second card I used a second embossed daffodil - this time the inverse impression. Hop there to see the full card or see it on the Uniko Blog.
K1-1348 - embossed daffodil - Detail
:-:-:-:-:-:-:-:-:-:-:-:-:-:-:-:-:-:-:-:
When you use an embossing powder what doesn't "want" to layer thick enough - don't give up! Use this first try, colour it as usual and make a card out of it.
And then make a second try of the layering with another embossing powder (and maybe another brand of paper).

My first one was clear powder from Ranger - and it stayed flat. Why? I still don't know!
The second try was with a white powder from efco (one of my oldest powders in the box) on a different paper. And this turned out great!

I will use it some more times to get impressions and then I will use it as "normal" embossed image on a card - so nothing is wasted! :-)
:-:-:-:-:-:-:-:-:-:-:-:-:-:-:-:-:-:-:-:
Entered here:
https://www.onlinecardclasses.com/springcardcamp/wp-content/uploads/sites/47/2020/04/SPRSCC2020-participant.png
Student Gallery, Days 1-5
:-:-:-:-:-:-:-:-:-:-:-:-:-:-:-:-:-:-:
Uniko Studio
Used Materials:
for the embossing panel:
Uniko Stamps: Stamps: Spring Botanicals /
Cardstock - white / Tsukineko: VersaMark Ink / efco: embossing powder - white /
Simon Says Stamp!: Die: Stitched Rectangles (SSSD111455) /

Colours & other stuff:
Cardbase A6 - white / Cardstock - green  /
Stampin'Up: Watercolour paper (122959) /
Kuretake/Zig: Clean Color Real Brush - yellow (050), light green (041) + water /
3D Tape, 2 mm / Kleberoller /
green satin ribbon, 3 mm / 
:-:-:-:-:-:-:-:-:-:-:-:-:-:-:-:-:-:-:
Hugs & greetings from Wiebke
:-:-:-:-:-:-:-:-:-:-:-:-:-:-:-:-:-:-:
Hope these cards inspire you to try this technique too!
Have a good time, stay at home and healthy and be creative!
😀